How to Change the Enrollment Filters
Minimum version: BrightArrow Base 2 v8.4.0
Formerly called Roster Settings, the enrollment lookup rules determine which students to include in scenarios that involve enrollment into a class. Originally these were district-wide settings that only affected current selections for teachers but have since been added so that they can be used in the roster export (for use with BrightChat) and on the admin side when looking up by section, teacher, or course number.
When to change the settings?
With the settings here you can change how many days before a student is enrolled in class and how many days after they've left the class that they show up in the class list. Because of this you can change the number of days to a larger number in the summer to give teachers early access to message students before school starts and then easily reduce it during the year if you'd like them to only get new students when they are about to join the class. If they are seeing students too long after the class enrollment ended, you can easily change the end padding to reduce the number of days the teacher can continue to message students once out of their class.
Pages that use these filters
- Teacher search section drop down uses the date rules to determine which students to include in the drop down
- Any search by course number, user, or teacher will obey the date rules to determine when to show/hide a student from the list.
PowerQueries that use these filters
- BrightArrow Student Course Enrollment
Getting to the filter settings
- Navigate to System Management > Data > BrightArrow Settings
- Click on Filters. If doing this from District Office (shown below) then select the filters in the row corresponding to the district or specific school you wish to alter.
- The filter options will slide in. Click on Lookup Rules
- Lookup Rules contains the various settings that can change by school, organized by topic. Click on Enrollment


What are the options?
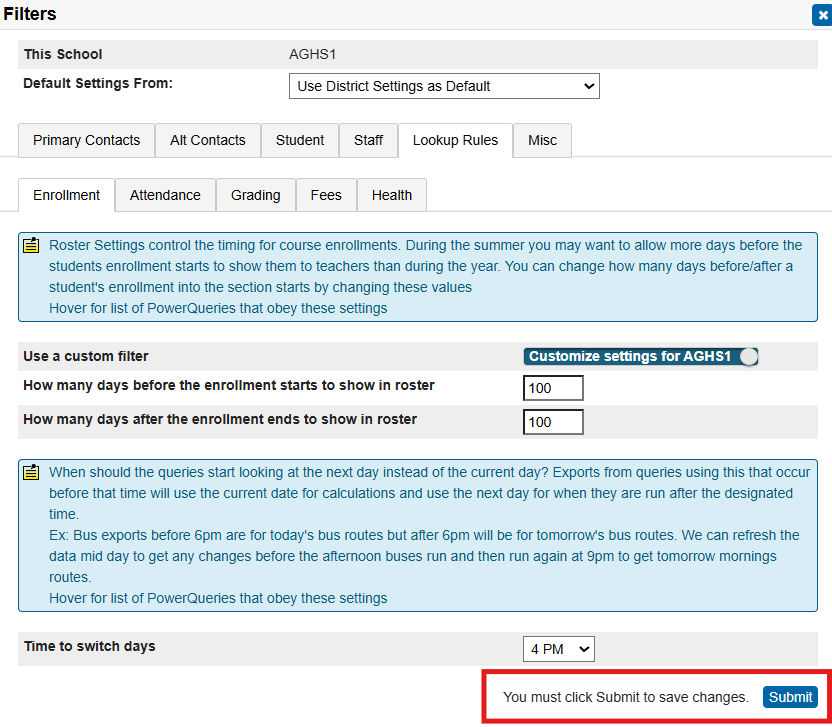
Use a custom filter: With this toggled ON, you can change the settings for the individual school building. If it's toggled OFF, the school will obey the district/default settings.
How many days before the enrollment starts to show in roster: Number of days before the start of the student's enrollment in the class to include them. In the summer you may want to give teachers earlier access to next year's students than during the school year. Adjust this to say how many calendar days before the enrollment start date to show this student as enrolled in the class.
- Default: 14
- Other Options:
- Any number you want -> This will be the number of calendar days, not in session days, as it is to work when school is out as well.
How many days after the enrollment ends to show in roster: Number of days after the end of the student's enrollment in the class to include them. Should the teacher be able to still see the student in the list after they left? Maybe only for a few days so that they can message them about work before grades are in? Maybe not at all? You decide how long can the teacher continue to message the student.
* Note: If the teacher has the student's info already saved, they will still be able to send messages to that through those other means. This can only prevent them from being added to new lists and will remove from roster sync lists.
- Default: 14
- Other Options:
- Any number you want -> This will be the number of calendar days, not in session days, as it is to work when school is out as well.
Time to switch days: Time of day that you want your padding options to start or be cut-off. Should teachers lose access to their student rosters at exactly 4:00pm on the 8th day after a student is no longer enrolled? Then set the number of days to after enrollment ends to 8 and the time to switch days to 4pm.
Once you've made your changes, click the submit button at the bottom of the window to save them.
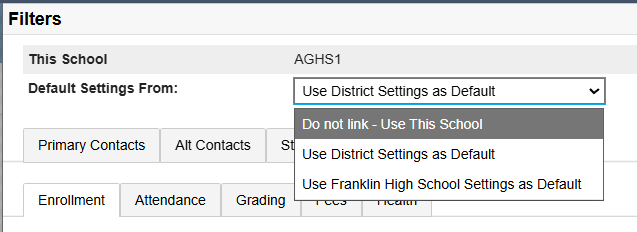
I have a school that wants different settings from the rest of the district
If you have different schools needing different settings, you can do that as well. First set up the district default by changing the filters in the District row. That will become the default for all schools that are not being overridden.
Once that is done, go to the school that needs different settings and click on Filters for that school. At the very top you will see "Default Settings From:". Change that to "Do not link" to be completely independent of the district settings. If another school already has the correct settings, you may also choose that school's abbreviation in the drop down and the two schools will be linked making one school use the other school's settings so you only need to make changes once. Note that the "Default Settings From" dropdown will apply the filters to ALL the options showing in the Filters window. If you only want to change the Enrollment settings, this option is not needed. Instead, follow steps #2-4 as detailed above and toggle ON the "use a custom filter" option.