Scheduling Meetings (for recipients)
If you received a BrightArrow message with a link to schedule a meeting, you can easily choose and confirm your appointment timeslot.
Scheduling the appointment
When someone invites you to a meeting, you will receive a link to sign up for it either as a text message, email, or both. If you use the ParentHub app, you'll be able to find the meeting invitation in your Feeds as well. After you click the link, you'll choose from the available timeslots and enter some basic information. You'll receive a confirmation email once you've scheduled the appointment.
- Click on the link that was sent to your email, text message, or ParentHub app. In the app, you can find the appointment in your Feeds and it will also be automatically copied to your ToDo tab.
- You'll see the name of person who is sending you the message as well as any notes they chose to include. You'll also see the date(s) that are available for you to schedule the appointment. Click/tap on a date to start scheduling your meeting on that day.
- After you select the time you'd like to schedule for, you'll see a pop-up window that requires you to complete some information.
- Name: Enter your name so the person who invited you to the meeting knows what to call you.
- Email: Enter your email address. Once you finish scheduling the appointment, a confirmation email will be sent to you at the address you enter. You will need that if you need to cancel the meeting later.
- Meeting on behalf of (dependent): If your meeting is regarding someone else (example: you are the parent, meeting with the teacher on behalf of your child; you are the caretaker, meeting with a healthcare professional on behalf of the person you care for).
- Notes: Add any notes you would like to share with the person who invited you to the meeting. You and the person who invited you will both be able to see your notes. You'll both be able to add additional notes later as well.
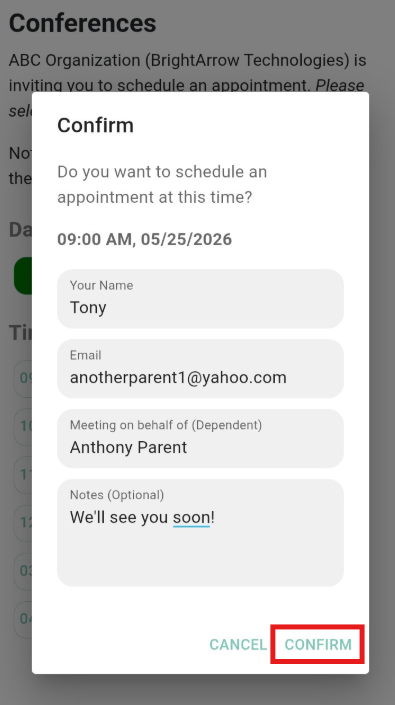
- Once you've entered all your information, click Confirm.
- Your appointment is now scheduled and the person who invited you will be notified. If you'd like to add the meeting to your personal calendar, click/tap "Add to Calendar" in the pop-up window. Choose from the available options which type of calendar you want to add the appointment to. If you don't want to add the appointment to your calendar, just click Close.
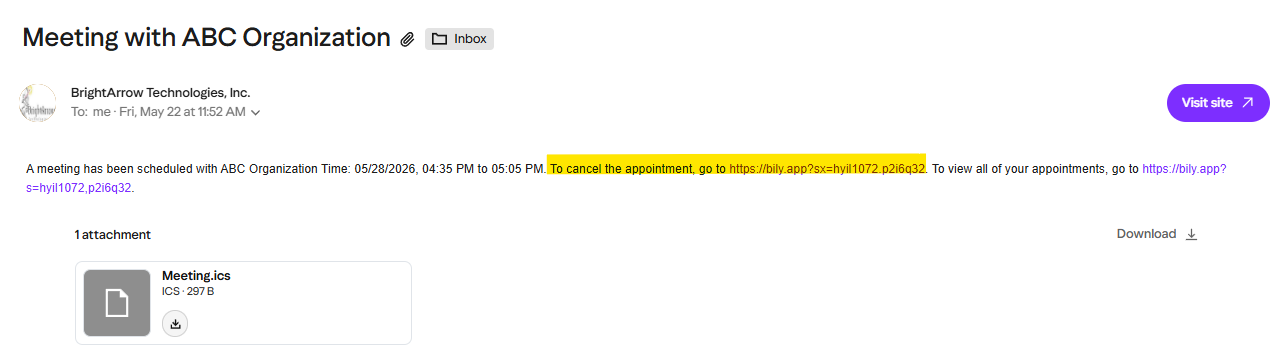
- You'll receive an automated email confirming your appointment. It will have the calendar file attached if you'd like to download it. It will also contain two links that you can use to cancel your appointment, add notes to your appointment, and/or view any other appointments you've scheduled with someone through BrightArrow.
 A listing of all available meeting times will show. Click/tap on the time you'd like to schedule.


Viewing the appointment after you scheduled it
If you don't use the ParentHub app, you can reference the confirmation email you received when you scheduled the appointment. If you use the ParentHub app you can view all of your scheduled appointments in the app by following the instructions below.
- Login to the ParentHub app
- Tap the Menu tab
- Tap Scheduled Appointments
- You will see all of your appointments that are scheduled during the current month, listed in order with the nearest date/time first.
- Use the date selection arrows at the top of the window to view appointments that you scheduled in a different month.
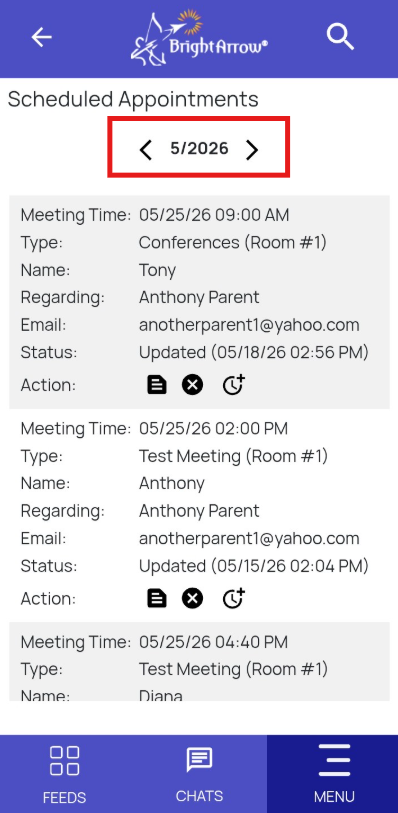
- You'll see the following information for each appointment:
- Meeting time - the time and date of the meeting
- Type - The title (and place) that was given to the appointment when it was originally created
- Name - Your name that you added when you scheduled the appointment
- Regarding - Who you are meeting on behalf of
- Email - Your email address that the appointment confirmation was sent to
- Status - Date and time when you last updated or scheduled the meeting
- Action - Additional actions you can take, such as adding additional meeting notes, cancelling the meeting, or scheduling an additional timeslot
- Use the search icon in the upper right to find a particular meeting. You can search based on your name, who the appointment is regarding, the name of the meeting, etc.


How to cancel your appointment
If you need to cancel your appointment, you can do that through the ParentHub app or through a link that was sent to you in the confirmation email you received. If you need to change the time for your meeting, you will need to cancel your existing appointment and schedule a new one.
If you are cancelling the appointment through the confirmation email you received, simply click on the link in the email to cancel the appointment.
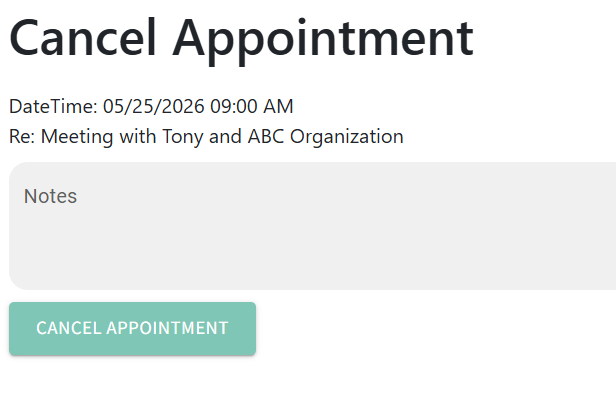
In the Cancel Appointment window, enter notes to let the person who requested the meeting with you know why you're cancelling, then click "Cancel Appointment."
ParentHub app
- Login to the ParentHub app
- Tap the Menu tab
- Tap Scheduled Appointments
- Find the appointment you wish to cancel
- Tap the icon that looks like a circle with an x in it
- In the Appointment Cancellation window, enter notes to let the person who requested the meeting with you know why you're cancelling, then tap "Cancel Appointment."
- The Status of your appointment will now show as "cancelled" and the meeting host will be informed.

How to reschedule your appointment
If you can no longer meet at the time you scheduled, you can cancel the appointment and schedule a new one. You can cancel and reschedule using the link that was sent to you in the confirmation email, or through the ParentHub app.
- If you are rescheduling the meeting through the confirmation email you received, start by clicking on the link to view your appointment.
- A window will open showing all appointments you scheduled through BrightArrow.
- Find the appointment you wish to reschedule. You can use the search bar at the top of the screen to help find the specific meeting you're looking for. Use the date selection arrows to view appointments that are scheduled during a different month.
- First, you should cancel your existing appointment.
- Click on the icon that looks like a circle with an x in it.
- In the Appointment Cancellation window, enter notes for the meeting host to let them know why you're cancelling, then click Cancel Appointment.
- With your original timeslot now cancelled, find the same meeting again but this time click the icon that looks like a clock with a plus sign
- The appointment scheduler will open up. Click on an available date you want to schedule for, then choose your preferred meeting time.
- Enter your name, email address, your dependent's name if applicable, and any notes you'd like to share with the person who requested the meeting with you.
- Click Confirm
- Add the meeting to your calendar if you wish. A confirmation email will be sent to the email address you provided in the previous step.
- You can close out of the Confirm window. Your new appointment time is now scheduled, and the person who requested the meeting with you will be notified.


ParentHub app
- Login to the ParentHub app
- Tap the Menu tab
- Tap Scheduled Appointments
- Find the appointment you wish to cancel
- Tap the icon that looks like a circle with an x in it
- In the Appointment Cancellation window, enter notes to let the person who requested the meeting with you know why you're cancelling, then tap "Cancel Appointment."
- The Status of your appointment will now show as "cancelled" and the meeting host will be informed.
Adding additional meeting notes
You can add additional notes to your meeting at any time either through the link in your appointment confirmation email or through the ParentHub app. Meeting notes will be visible to you and to the party you are meeting with.
- If you are adding notes to the meeting through the confirmation email you received, start by clicking on the link to view your appointment.
- A window will open showing all appointments you scheduled through BrightArrow.
- Find the appointment you wish to add notes to. You can use the search bar at the top of the screen to help find the specific meeting you're looking for. Use the date selection arrows to view appointments that are scheduled during a different month.
- Click on the icon that looks like a notepad.
- In the Appointment Notes window, enter your additional notes in the "New Note Entry" box.
- You will see all previously entered notes in the "History Notes" box.
- If you'd like your notes to be emailed to you as well, mark the "Email Notes" checkbox. Marking the Email Notes box will send a separate email with the new note to you and the person you're meeting with.
- With your new note now entered, click Save.


ParentHub app
- Login to the ParentHub app
- Tap the Menu tab
- Tap Scheduled Appointments
- Find the appointment you wish to add notes to.
- Tap the icon that looks like a notepad.
- In the Appointment Notes window, enter your additional notes in the "New Note Entry" box.
- You will see all previously entered notes in the "History Notes" box.
- If you'd like your notes to be emailed to you as well, mark the "Email Notes" checkbox. Marking the Email Notes box will send a separate email with the new note to you and the person you're meeting with.
- With your new note now entered, tap Save.

