How to Change the Multi-Day Attendance Category Filters
Minimum version: BrightArrow Base 2 v9.2.1
The multi-day attendance filters allow schools to set up their own business logic for which attendance situations require a message sent to the student and/or parent. The default settings can be set at the district level but each school can also set their own settings if they need something different. The recommendation is to set the default at the district that represents the most common settings and only change the individual buildings that need something different.
Note: Since there are many different ways schools calculate their multi-day attendance there are several sections for settings. This will only discuss the grouping by category options.
PowerQueries that use these filters
Filter 1 settings:
- BrightArrow Attendance Daily Frequency by Code Category - from Filter 1
- BrightArrow Attendance Meeting Frequency by Code Category All Sections - from Filter 1
- BrightArrow Attendance Meeting Frequency by Code Category - from Filter 1
Filter 2 settings:
- BrightArrow Attendance Daily Frequency by Code Category - from Filter 2
- BrightArrow Attendance Meeting Frequency by Code Category All Sections - from Filter 2
- BrightArrow Attendance Meeting Frequency by Code Category - from Filter 2
Getting to the filter settings
- Navigate to System Management > Data > BrightArrow Settings
- Click on Filters. If doing this from District Office (shown below), then select the filters in the row corresponding to the district or specific school you wish to alter.
- The filter options will slide in. Click on Lookup Rules
- Lookup Rules contains the various settings that can change by school, organized by topic. Click on Attendance
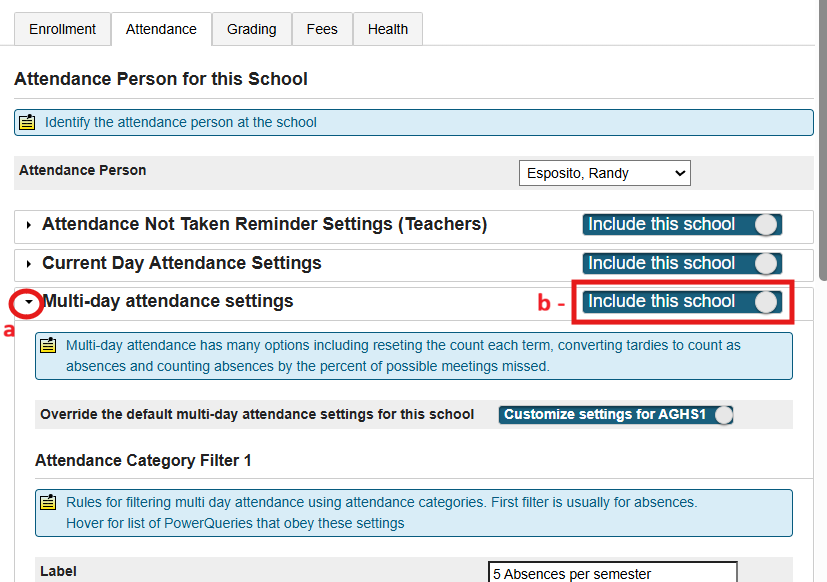
- Find the Multi-day Attendance Settings section
- Use the "Include this school" toggle to include or exclude the school from the Multi-Day Attendance reminders as needed.
- Click the drop-down arrow in the Multi-Day attendance settings row to see additional options.


What are the options?
Override the default multi-day attendance settings for this school: Toggle on to customize settings for the specific school building. Toggle off to use the default/district-wide settings. Note that this option is not available if you're changing this for the District level because the district settings are the default. This option is available only when overriding the district-wide settings for a particular school building.
Label: This is a place to enter a note to yourself as to the goal of this filter. Since there are two sets of filter settings you can use it to differentiate between them.
- Default: None
- Other Options:
- Anything you want -> Give yourself and others who look a way to know what the goal of these filters are.
Attendance Code Category: Which attendance category to use. The drop down will populate with all the available values that have already been set up.
- Filter 1 Default: Multi-Day Attendance
Filter 2 Default: Multi-Day Tardy - Other Options:
- Any category you have -> It is recommended to use new categories, just as those recommended in Setting up Multi-Day Attendance Code Categories as opposed to those that are set up for other reasons so as to avoid a problem where a code should be included for one use and not included for another.
- No Category -> This will allow you to manually enter in the valid attendance codes instead of using a category.
- NC users should use this method! NC does not allow for any additional attendance categories as they are forcibly cleared each night. Manually entering the codes is safer as it does not get touched by NC state cleanup.
Attendance Codes (comma separate): Only shows when Attendance Code Category is No Category. This allows schools to hand enter the code(s) they want to use.
- Default: blank -> normally not needed, use code category instead
- Other Options:
- 2A,2L -> List the code(s) you want to use. If more than one comma separate them
How many school days to wait: Do you want today's attendance to trigger the message or would you like to give some time for notes and/or conversations with the student's parent/guardians before sending the message?
- Default: Report the day of attendance -> If the attendance is for today then report it, no waiting
- Other Options:
- Report the 1st school day after attendance -> Today's export will be reporting on the previous in session day, allowing 1 day for the code to be changed due to a note or phone call to a parent/guardian.
- Report the 2nd school day after attendance -> Today's export will be reporting on the 2 in session days prior, allowing 2 school days for the code to be changed due to a note or phone call to a parent/guardian.
- Report the 3rd school day after attendance -> Today's export will be reporting on the 3 in session days prior, allowing 3 school days for the code to be changed due to a note or phone call to a parent/guardian.
When to reset the counts: Many schools would like to reset the count after a certain amount of time instead of having a rolling count for the entire year. Here you will signal how often the counter resets. Terms are the school terms, not the store code start/end dates.
- Default: Full Year -> The counter doesn't reset, keeps accruing for the entire school year.
- Other Options:
- 1/2 (Semesters) -> Count resets at the semester break
- 1/3 (Trimesters) -> Count resets at each trimester break
- 1/4 (Quarters) -> Count resets at each quarter break
- 1/5
- 1/6
- 1/7
- 1/8
- 1/9
- 1/10
- 1/11
- 1/12
Check if att count is a multiple of this: If you wish to send messages based on a multiple (3, 6, 9 or 4, 8,12 or 5,10,15, etc) you can set it here and the export will only send when the count reaches a multiple of that number. If your messages go out at intervals that are not a multiple (ex: 3, 5, 9) then use 1 so it will send each one and then let us know so we only import on your intervals.
- Default: 1
- Other Options:
- 2 -> Send every time the count reaches a multiple of 2 such as 2, 4, 6, 8
- 3 -> Send every time the count reaches a multiple of 3 such as 3, 6, 9, 12
- 4 -> Send every time the count reaches a multiple of 4 such as 4, 8, 12, 16
- 5 -> Send every time the count reaches a multiple of 5 such as 5, 10, 15, 20
- 6 -> Send every time the count reaches a multiple of 6 such as 6, 12, 18, 24
- 7 -> Send every time the count reaches a multiple of 7 such as 7, 14, 21, 28
- 8 -> Send every time the count reaches a multiple of 8 such as 8, 16, 24, 32
- 9 -> Send every time the count reaches a multiple of 9 such as 9, 18, 27, 36
- 10 -> Send every time the count reaches a multiple of 10 such as 10, 20, 30, 40
- 11 -> Send every time the count reaches a multiple of 11 such as 11, 22, 33, 44
- 12 -> Send every time the count reaches a multiple of 12 such as 12, 24, 36, 48
- 13 -> Send every time the count reaches a multiple of 13 such as 13, 26, 39, 52
- 14 -> Send every time the count reaches a multiple of 14 such as 14, 28, 42, 56
- 15 -> Send every time the count reaches a multiple of 15 such as 15, 30, 45, 60
Message Intervals (comma separate): Only shows if "Check if att count is a multiple of this" is set to 1. With multiples the query knows to include every X times. When set to 1 then all would show. This allows you to say what thresholds to send messages when they are not a multiple such as 3,6,10.
- Default: blank
- Other Options:
- 3,6,10 -> You enter the threshold(s) to include. In the example the query will report on the 3rd, 6th and 10th instances only.
- ex: We send a warning notice on the 3rd and 6th absence and a loss of credit notice on the 10th. Since the student lost credit there is no further need to message the family.
- 3,6,10+ -> Adding + to a number indicates you want every instance starting with that number. In the example the query would look for the 3rd instance, the 6th instance and every instance starting at the 10th.
- ex: We send a message about frequent absences when the student reaches 3 and 6 absences and then starting at the 10th absence we send that same notice every single time.
- 3,6,10 -> You enter the threshold(s) to include. In the example the query will report on the 3rd, 6th and 10th instances only.
Sections with multiple periods the same day: If you have sections that span multiple periods, you can use this option to count only the section or to count each period.
- Default: Count 1 time per day per section
- Other Options:
- Count each period
I have a school that wants different settings from the rest of the district
If you have different schools needing different settings, you can do that as well. First set up the district default by changing the filters in the District row. That will become the default for all schools that are not being overridden.
Once that is done, go to the school that needs different settings and click on Filters for that school. At the very top you will see "Default Settings From:". Change that to "Do not link" to be completely independent of the district settings. If another school already has the correct settings, you may also choose that school's abbreviation in the drop down and the two schools will be linked making one school use the other school's settings so you only need to make changes once. Note that the "Default Settings From" dropdown will apply the filters to all the options showing in the Filters window. If you only want to change the Multi-Day Attendance settings, this option is not needed. Instead, follow steps #2-5 as detailed above.

Why are there two sets of category filters?
Many schools have multiple situations within the same building such as sending every 4 tardies and every 9 absences. Having two sets of filters allows for schools who need more than one setup.
What if I want tardies to be included in my absence messages?
You can do that. You can include tardy codes in your category and they will be included. If you want each tardy to count as only a partial absence you can set that by changing the Tardy to Absence Conversion settings. All PowerQueries listed above will obey the tardy conversion settings as well if tardy codes are assigned to the category. For more information on the Tardy to Absent conversion see How to Change the Tardy to Absent Conversion Filters