How to Send a Voice Call
BrightArrow allows you to send messages via phone calls, text messages, emails, and even social media posts. In this article we'll be looking at how to create and send an outgoing phone call.
- Login to BrightArrow.
- Go to My Lists.
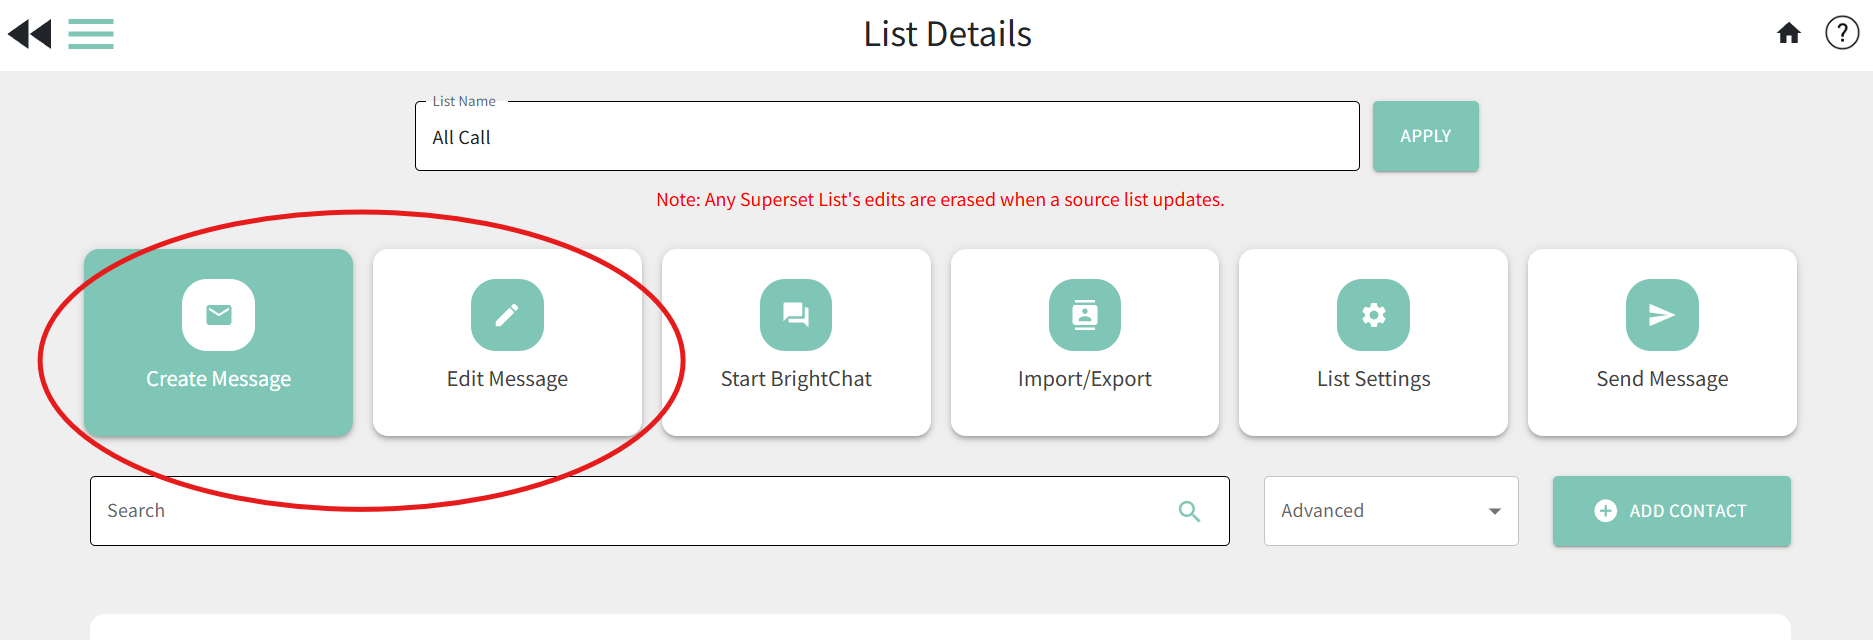
- Find the list you want to send your message from and click on the list's name.
- Click on Create Message OR Edit Message depending on if you are starting from scratch or starting from where you left off before.
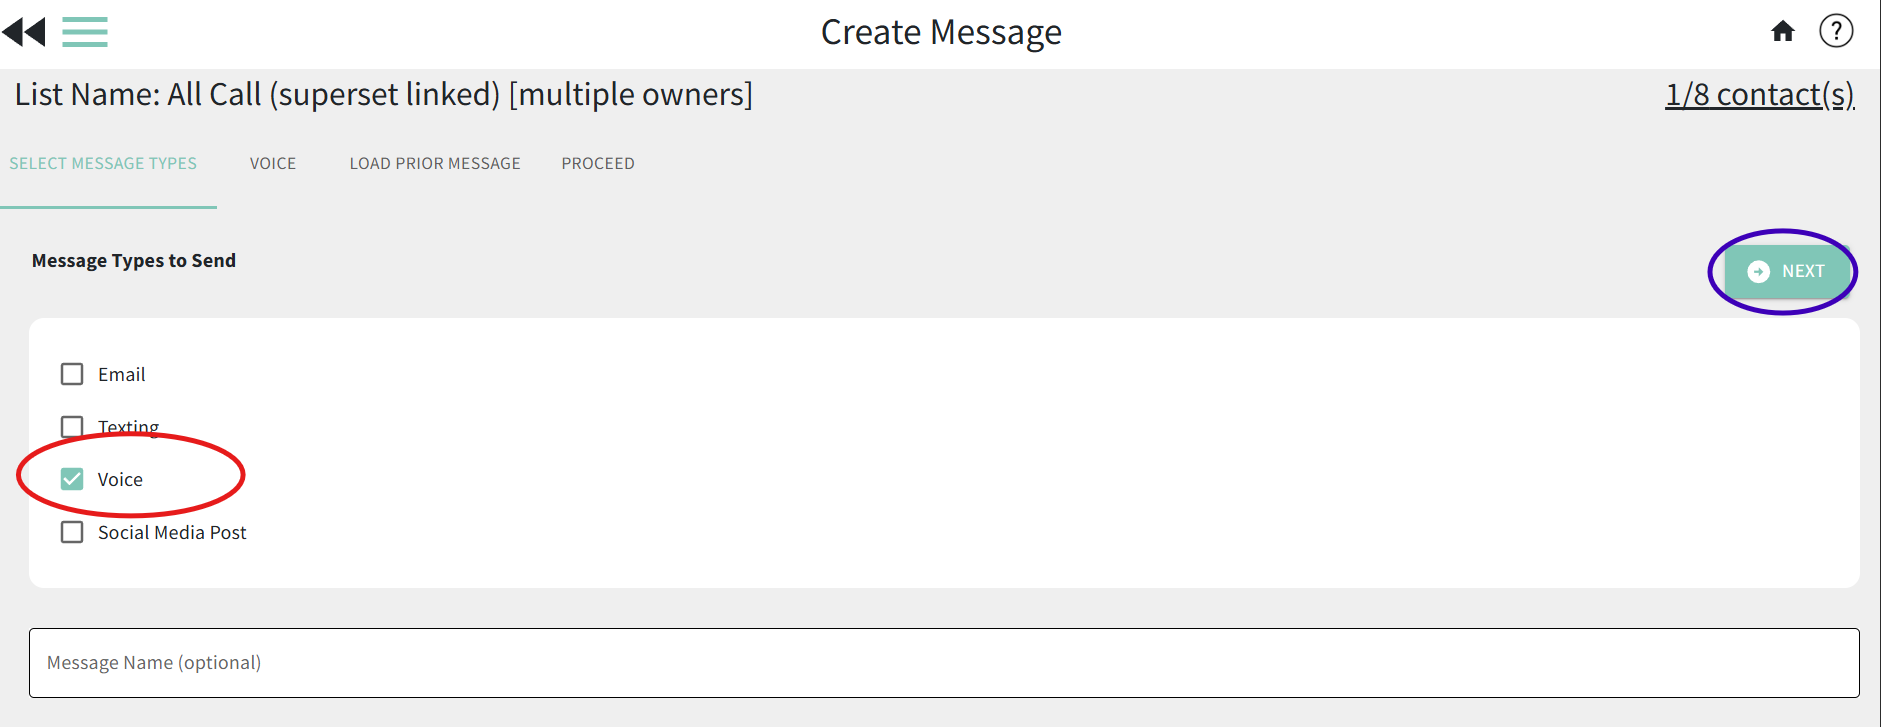
- Check the box for Voice to say you are trying to send a phone call. You may send other message types at the same time, but for voice messages the Voice box must be checked.
- Once you've selected the message types and named your message, click Next.
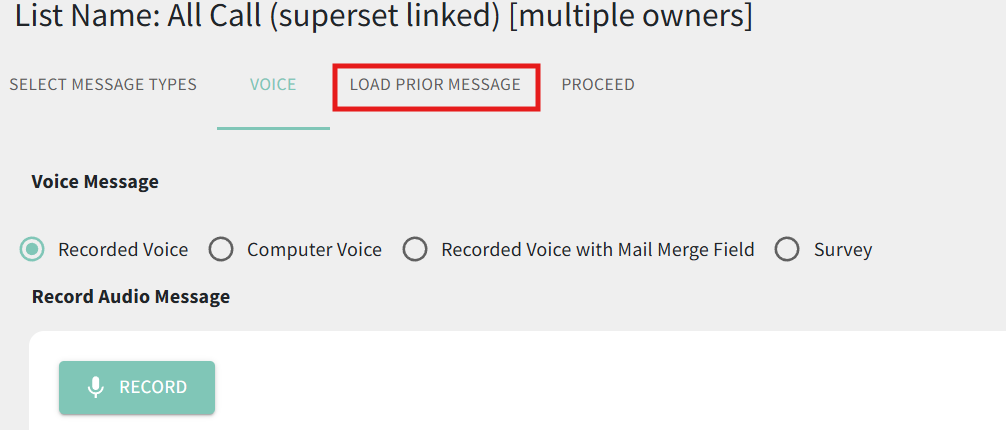
- Voice calls have three options:
- For a recorded voice message select Recorded Voice
- Recorded Voice with Mail Merge Fields allows you to use a recording for part of the message and inject mail merge fields which the computer reads for other parts.
- Computer Voice takes what you write as the outgoing message and the system reads it. This option also allows for translating into the contacts language if you are tracking that.
- You may see a fourth option for "Survey." For more information about sending voice surveys, see here.


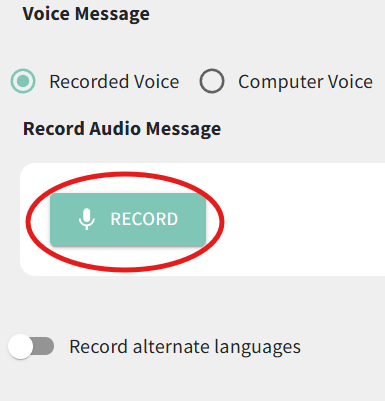
Recorded Voice calling
You can record your voice message through BrightArrow or you can upload a file if you already recorded your message and saved it as a separate file. Voice messages can be up to 2 minutes in length.
- With the "Recorded Voice" radio dial selected, click the Record button.
- Add the recording to the message using one of the 4 ways listed below.
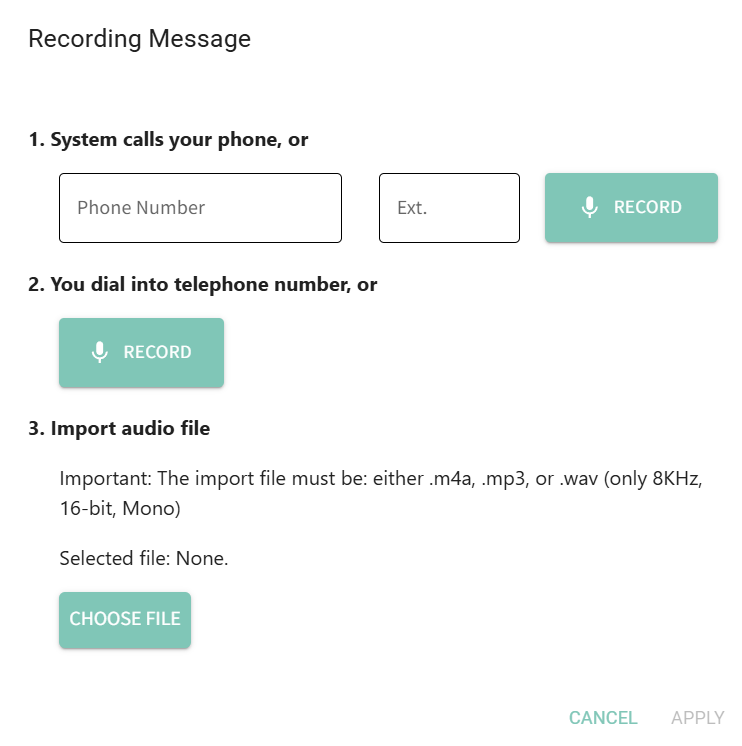
- (1) System Calls Your Phone: In this method our system will call whatever number you enter in the Phone Number box.
- Enter a phone number in the Phone Number box.
- Click Record.
- Our system will call the phone number provided and prompt you to record a message.
- After recording, the system will prompt the person on the phone to review the message, this is highly recommended to make sure there wasn't any problem with the phone call.
- While this is happening, a red message will show in the screen to let you know the call is in progress.
- Once the message has been recorded the red message will change to "Recording is complete" and will have the recording for you to listen to. Click Apply to add your recording to the message creator page.
- (2) You dial into a telephone number: With this option we will provide 2 phone numbers located in 2 different parts of the country so that if one has a problem you can use the other.
- With your phone call one of the 2 phone numbers provided.
- When prompted enter the unique values for ID and Password provided on the screen to let the system know what message you are trying to record to.
- You will be prompted to record a message.
- After recording, the system will prompt the person on the phone to review the message, this is highly recommended to make sure there wasn't any problem with the phone call.
- Once the message has been recorded the red message will change to "Recording is complete" and will have the recording for you to listen to. Click Apply to add your recording to the message creator page.
- (3) Import Audio File: If you've saved a recording from before or if you recorded your message on your computer and want to upload it you can use this option instead of relying on the phone system to record the outgoing message. Some users have even added production such as background music to their outgoing messages before uploading them.
- At the bottom of the Recording Message window, click Choose File.
- In the pop-up window, find the file on your device then click Open. The import file must be a .m4a, .mp3, or .wav (only 8KHz, 16-bit, Mono) and less than 50MB.
- Click Apply to add your recording to the message creator page.
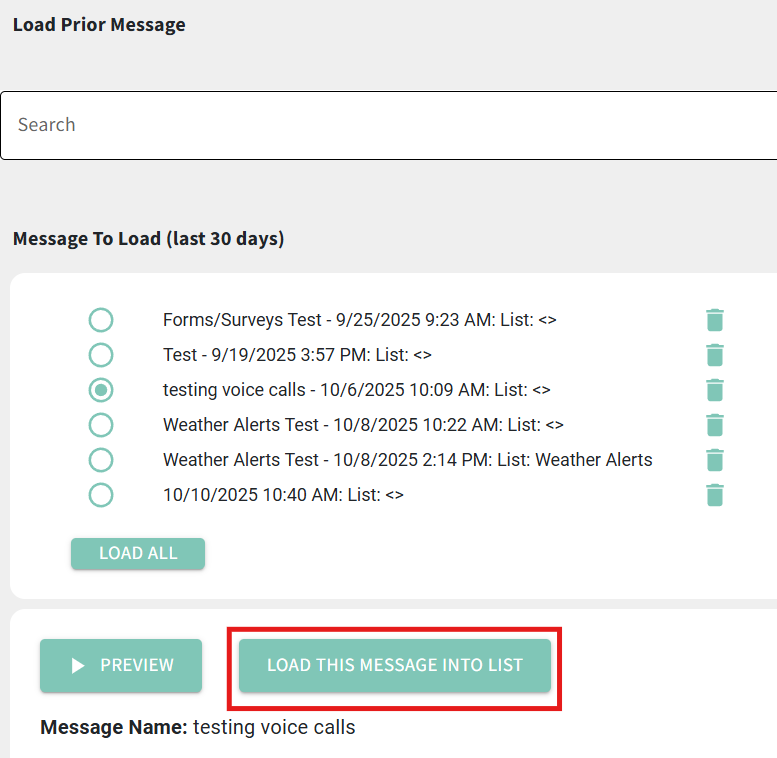
- Load a Prior Message: If you've already sent this message before you can find the message in the Prior Messages screen and load it. If there was a recording in the prior message it will be loaded to your new voice message.
- Instead of clicking the Record button, click Load Prior Message at the top of the page.
- Find the message you wish to load and mark the radio dial next to it to select it.
- Use the Preview button to listen to the message if you wish.
- Click Load this Message into List to load the prior message into your current message.
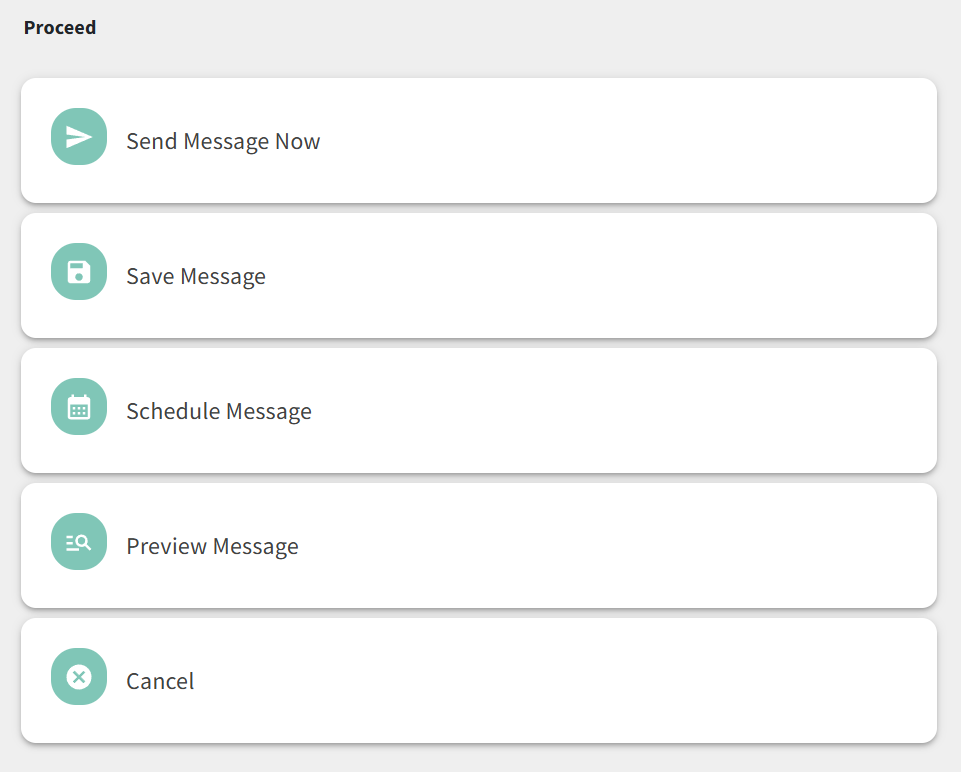
- Once your recorded voice message is created, click the Next button to proceed to the final sending screen. You may want to also check your list's settings for the outgoing Phone Call Settings to make sure your message will go out to contacts as you intend it to.
- Click "Send Message Now" to send your message right away.
- Click "Save Message" to save your message to the list. You can return to it to make changes or send at a later time by going back to the list and clicking "Edit Message."
- To schedule the message to send at a future time(s), click "Schedule Message."
- To send the message to yourself to preview before sending it to your contact list, click "Preview Message."
- If you don't want to send or save the message, click "Cancel."


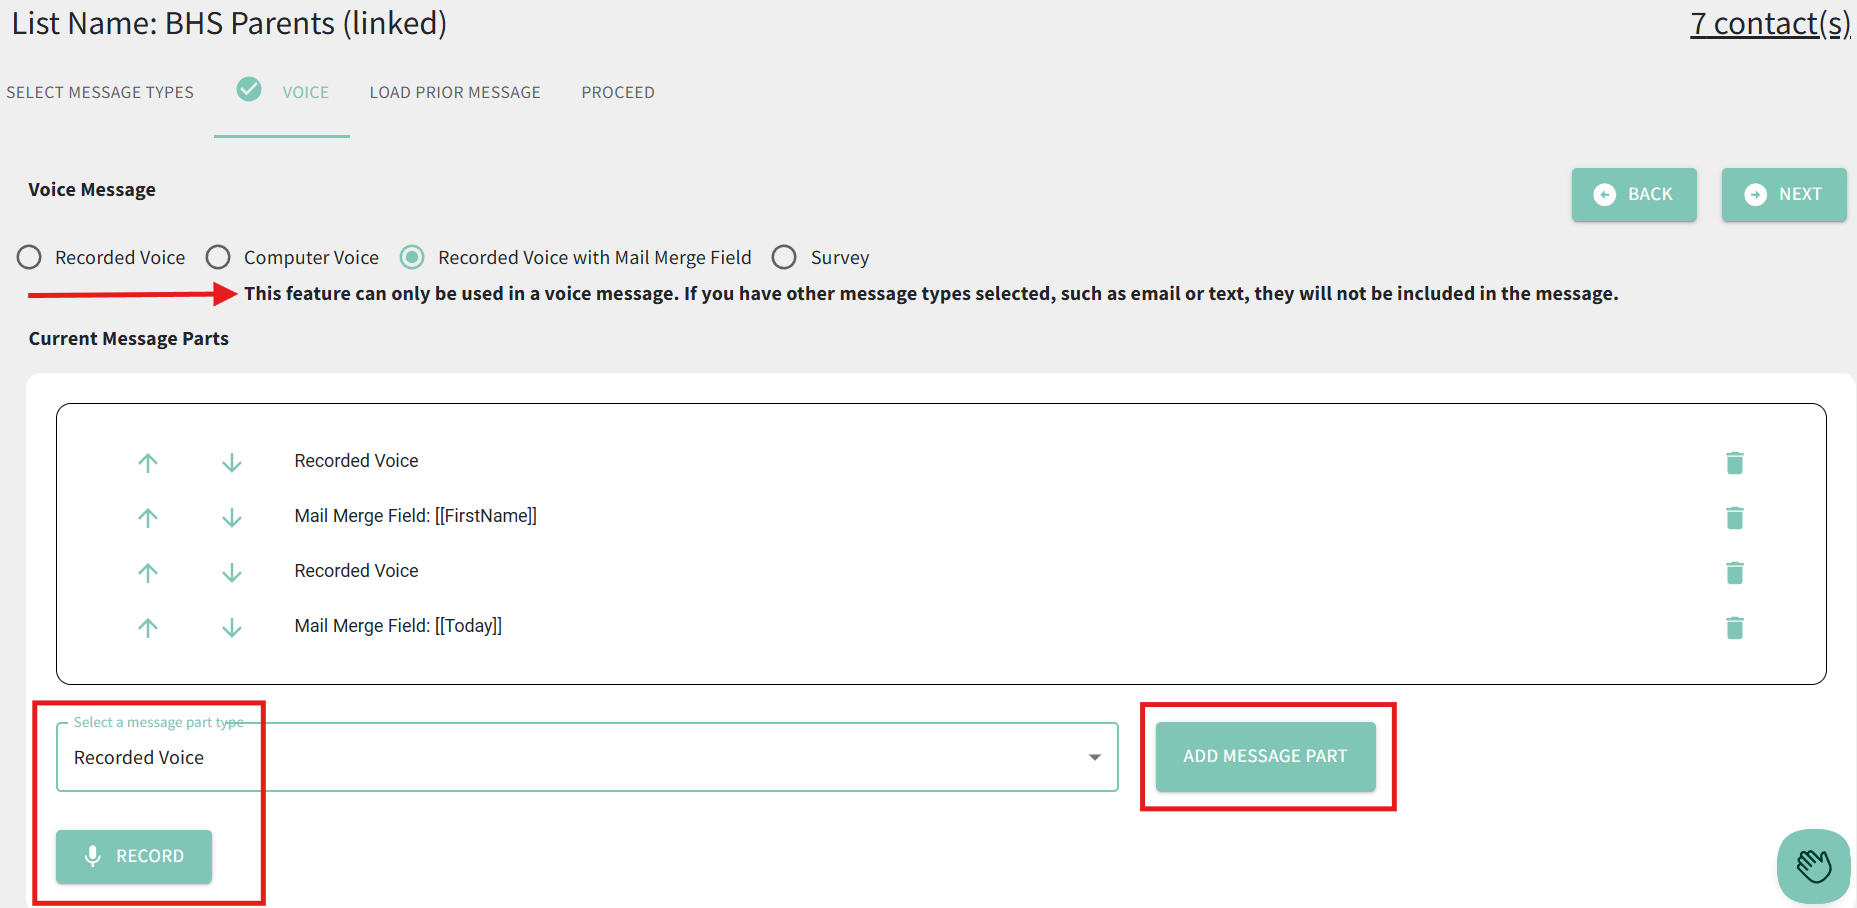
Recorded Voice with Mail Merge Fields
Using this option, you can create a multi-part message so that you can send a voice recording that dynamically includes mail merge field information.
IMPORTANT: This option can only be used if you are creating a voice message only. Do NOT use this option if you have also selected the email and/or text message types. We strongly suggest that you " preview" the message before sending it to your constituents to make sure each part is exactly how you want it.
- With the "Recorded Voice with Mail Merge Field" radio dial selected, create your message by adding one message part at a time.
- To add part of your recording to the message, choose Recorded Voice as the message part type. Click the Record button to record the portion of your message up until the mail merge field needs added. Then click the button to Add message part.
- To add a mail merge field to your message, choose Mail Merge Field as the message part type. Choose which field to use, then click Add message part.
- Continue adding each message part until your message is complete.
- When you send your message, it will compile your voice recordings along with a computer voice inserted for any mail merge fields. It will not be translated to your recipients' preferred language.
- Once your message is built to your liking, click the Next button to proceed to the final sending screen. You may want to also check your list's settings for the outgoing Phone Call Settings to make sure your message will go out to contacts as you intend it to.
- Click "Send Message Now" to send your message right away.
- Click "Save Message" to save your message to the list. You can return to it to make changes or send at a later time by going back to the list and clicking "Edit Message."
- To schedule the message to send at a future time(s), click "Schedule Message."
- RECOMMENDED: To send the message to yourself to preview before sending it to your contact list, click "Preview Message."
- If you don't want to send or save the message, click "Cancel."
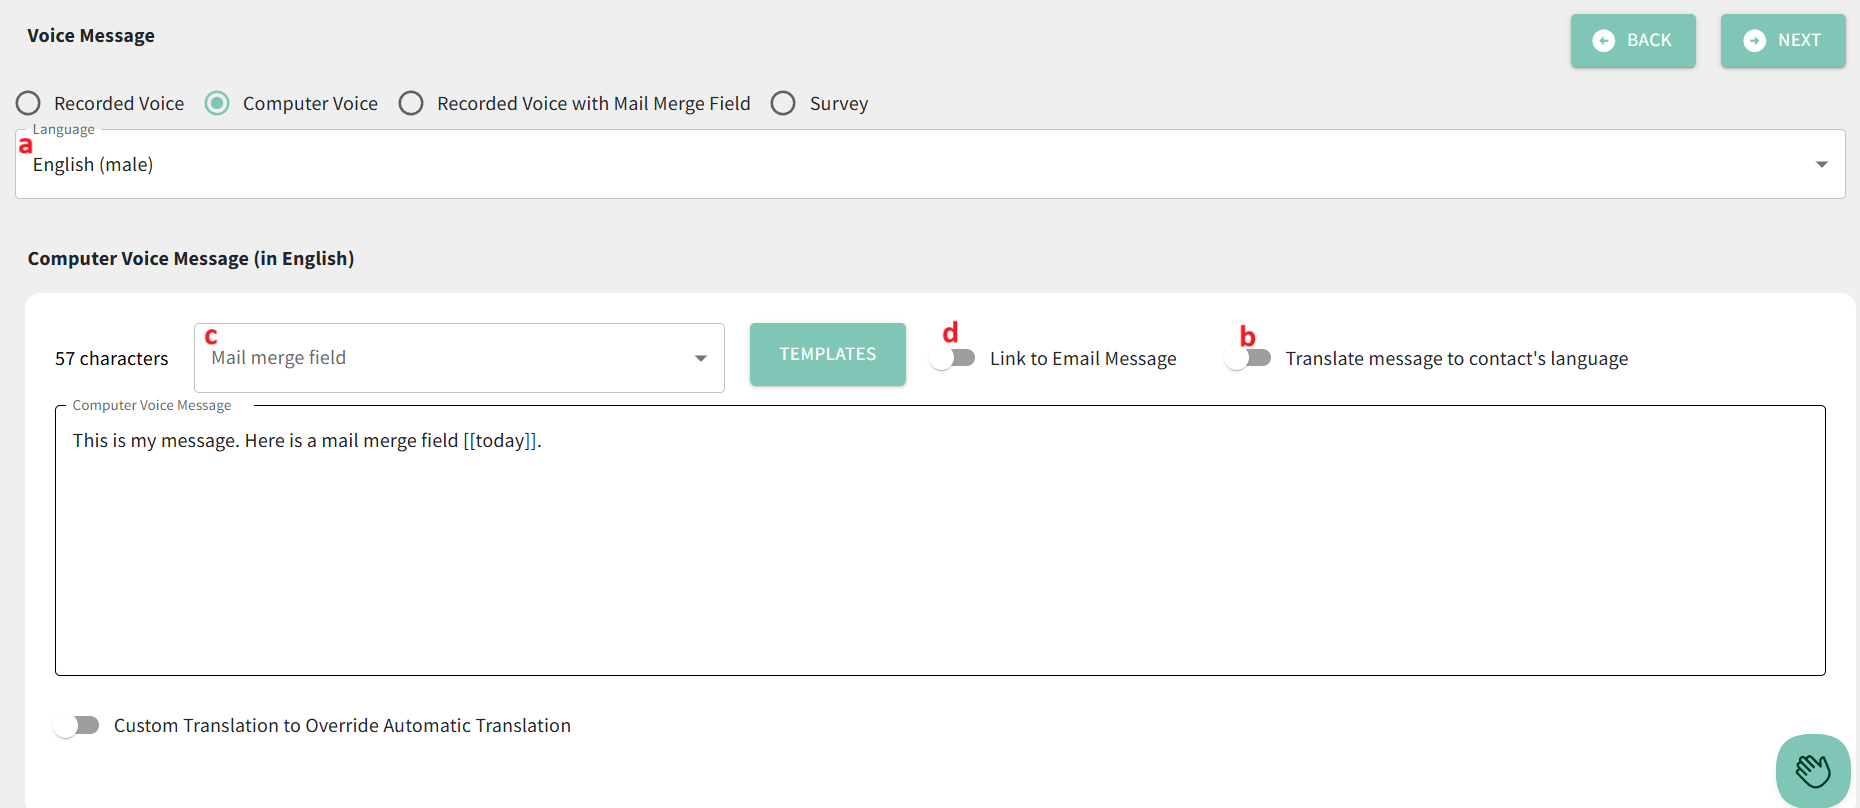
Computer Voice calling
Using this option, you can type your message and a computerized voice will read it. If you have your contacts' preferred languages set up, this is the best option to use to properly translate your message to your contacts' language.
- With the "Computer Voice" radio dial selected, type your message in the "Computer Voice Message" box. The computer voice will read whatever you type there.
- Use the Language box at the top of the page to tell the computer which voice to read your message in. English is the default language.
- Computer Voice messages can be translated to your recipients' preferred language by turning the corresponding toggle ON.
- Mail merge fields work for Computer Voice messages the same as they do for SMS and email messages.
- If you also created an email message, the text of the email will automatically populate on the voice messaging screen when the Computer Voice option is selected. Overwrite it as needed by turning the "Link to Email Message" toggle OFF. Turn the "Link to Email Message" toggle ON to re-populate the text from the email message (all formatting will be removed).
- Once your message is built to your liking, click the Next button to proceed to the final sending screen. You may want to also check your list's settings for the outgoing Phone Call Settings to make sure your message will go out to contacts as you intend it to.
- Click "Send Message Now" to send your message right away.
- Click "Save Message" to save your message to the list. You can return to it to make changes or send at a later time by going back to the list and clicking "Edit Message."
- To schedule the message to send at a future time(s), click "Schedule Message."
- To send the message to yourself to preview before sending it to your contact list, click "Preview Message."
- If you don't want to send or save the message, click "Cancel."
