Setting Up and Using the BrightArrow SafeCast Feature
The BrightArrow SafeCast feature allows your organization to setup pre-determined emergency actions based on pre-planned conditions. Authorized users can then either text a keyword to launch that action, use the BrightArrow app to choose the action, or launch it from the Web login.
If your organization has added a subscription to SafeCast, you can set up the emergency lists yourself by following the instructions below.
Setting up SafeCast
The recommended approach is to create a special User Group (such as “SafeCast Alerts”) that contains only those lists that define the potential situations for which you want to pre-plan.
Create a user group
- Login to the primary admin (superadmin) account
- From the BrightArrow Central home page, click on User Accounts
- Create a new User Group that is dedicated to your SafeCast lists
- Click Add User
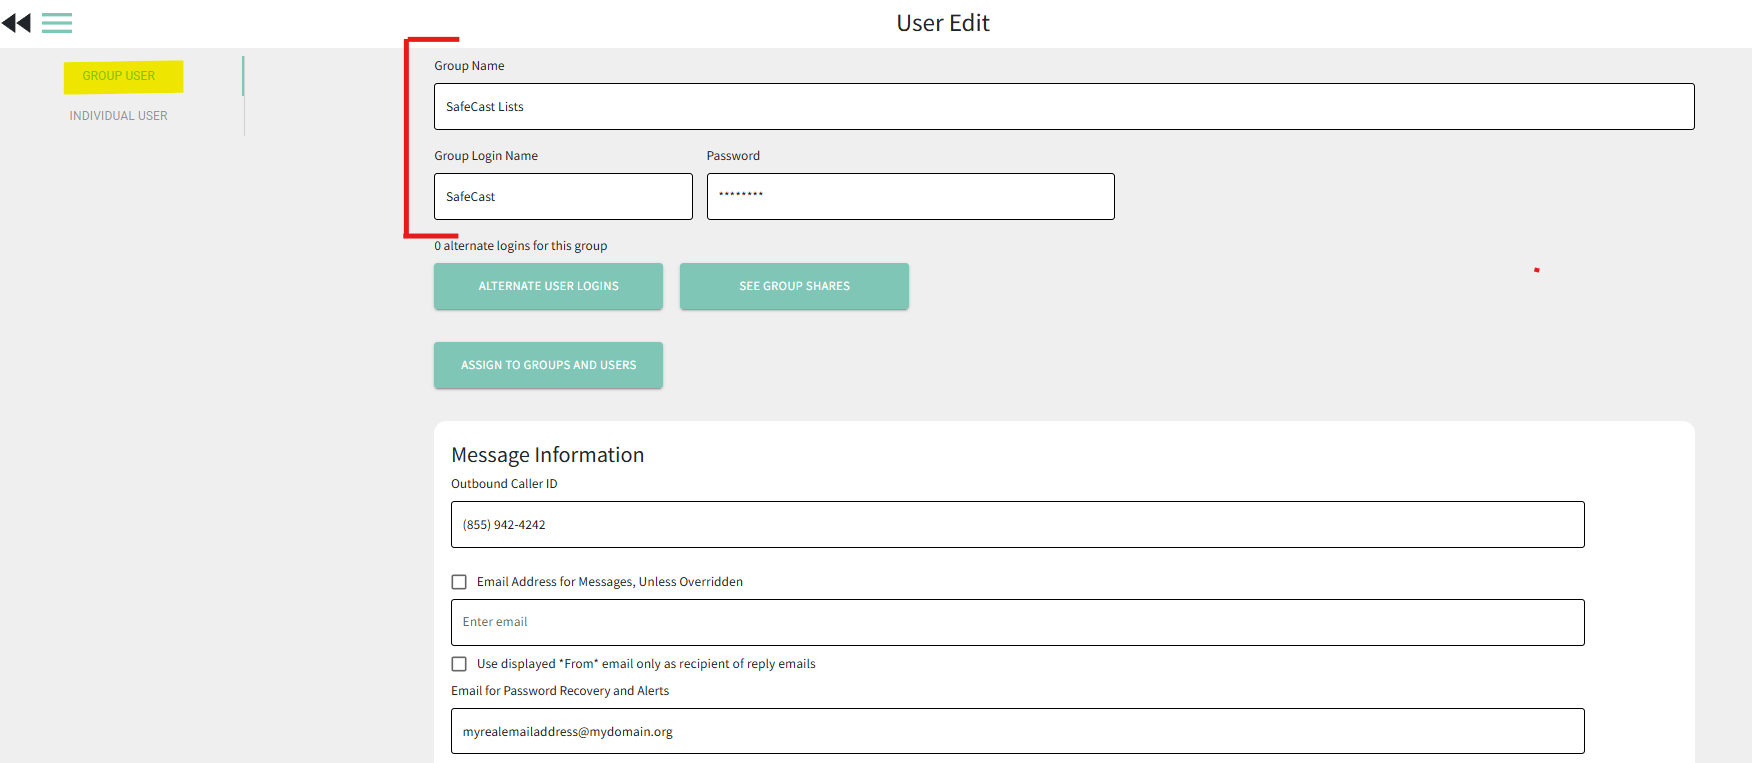
- With the "Group User" tab selected on the left, enter the group name, group login name, and a password for the new user group. Passwords must be at least 8 characters long and contain at least 1 digit.
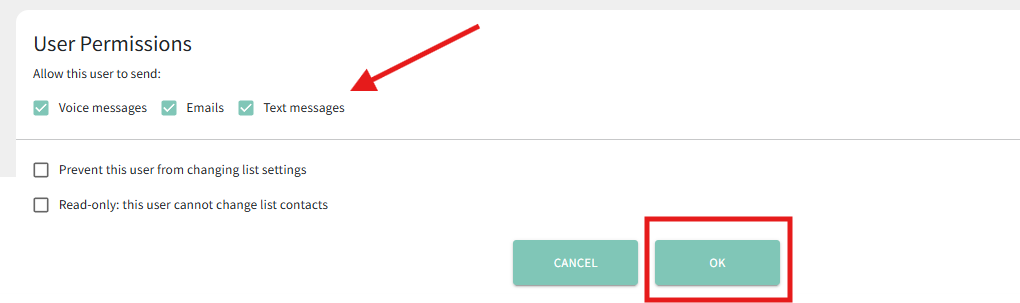
- Ensure the new SafeCast user group has the proper permissions to send all message types as applicable based on your SafeCast subscription.
- Click OK. The new user group for your SafeCast system is now set up.


Setup lists for each situation
Still logged in as the administrator, set up one list for each planned situation with a name that explains the exact nature of that situation, an easy-to-remember keyword, and referencing a list contain the contacts who are authorized to text that keyword.
The first thing to do is to determine who will be able to initiate the SafeCast messages and who should receive the messages once they've sent. You will need one list that contains only the people who can initiate the SafeCast message, and one list that contains all of the message recipients.
- If you need to create a new linked list that contains only the people who will be able to initiate the SafeCast message, see here for help creating a copy of a list and enabling only the members who will have the power to send the message. In step #4, you will designate that list as the SafeCast "Valid Initiators."
- If you do not already have a list that contains all of the contacts to receive the emergency messages, see here for help creating a superset list that contains them all. In step #2, you will make a copy of that list to use for SafeCast messaging.
- From the My Lists page, check the box next to the list that contains all of the contacts who should be receiving the SafeCast messages.
- Click the Select an Action button, then choose the option to Copy a List
- Create a linked copy of your source list
- Give the new SafeCast list a name that makes it easy to identify and clearly describes what the list is to be used for. For example, "Lockdown Emergency."
- Make sure the checkbox next to "Keep Linked to Source List" is checked/enabled. This will create a "linked" list that will update from your source list automatically.
- Verify that the "Source List" is the correct list that you want to make a copy of. What shows there is the list that you marked the checkbox next to in step #2. If you want to copy a different list, use the dropdown to select a different list.
- Leave the other box unchecked.
- Click OK
- Configure your new linked list to be a SafeCast list in the List's Settings
- From the My Lists page, hover over the name of the new linked list you just created. Some icons will appear. Click the "gear" icon to access the List Settings
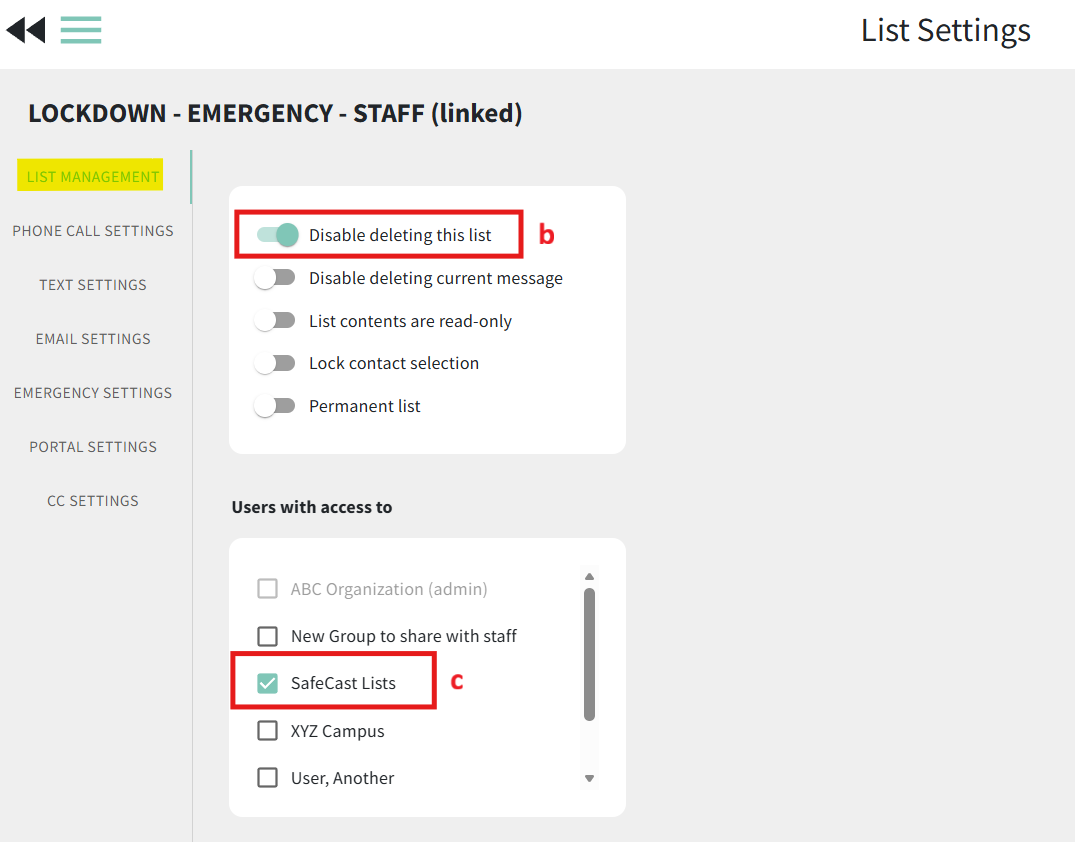
- Under List Settings > List Management, you may want to toggle ON "Disable deleting this list" so that it doesn't accidentally get deleted. If you ever need to delete the list in the future, simply toggle that option off to proceed with deleting it.
- In the "Users with access to" section (still in List Settings > List Management), mark the checkbox next to the SafeCast group to add the list to the SafeCast folder. You may then deselect the admin folder if you wish.
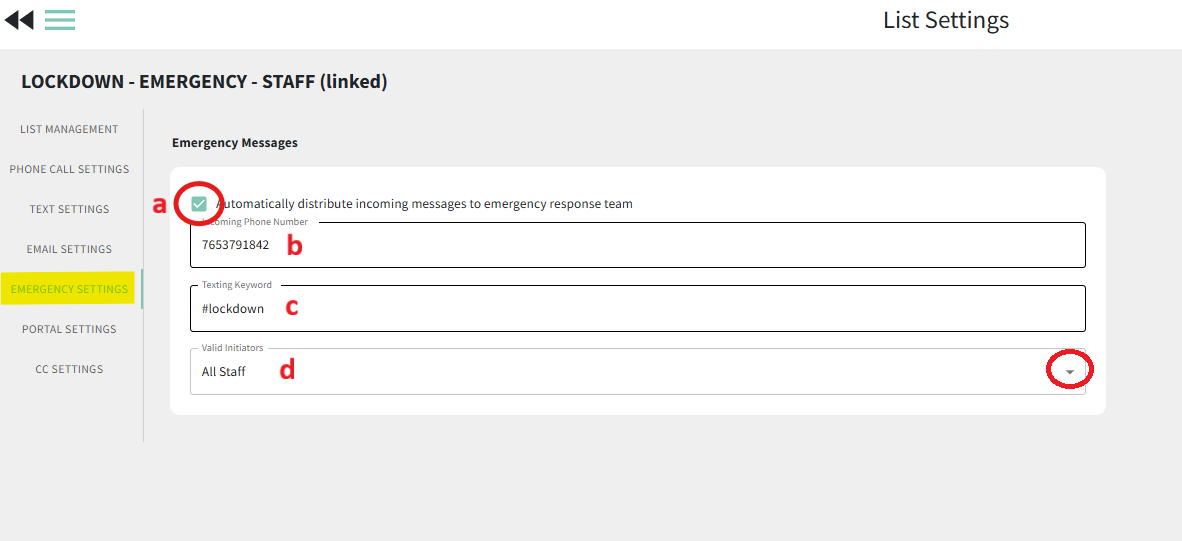
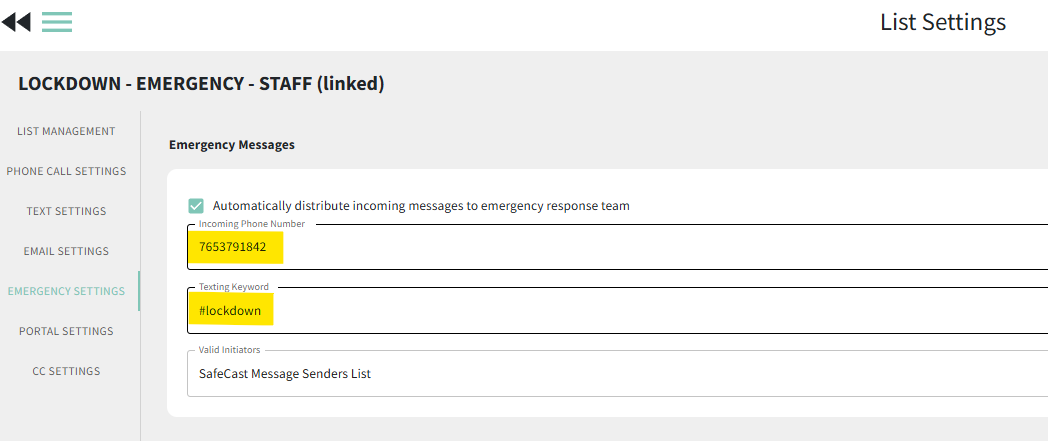
- Still within the List Settings, navigate to the Emergency Settings tab on the left.
- Mark the checkbox to "Automatically distribute incoming messages to the emergency response team"
- Enter the phone number that was provided to you by BrightArrow
- Create a texting keyword that is straight-forward and easy to remember
- Choose your list of "valid initiators" who will be given the power to text into the list to launch the message. *We suggest that each message sender either have the texting phone number setup as a speed dial on their phone, or be running the BrightArrow ParentHub app, or both.
- Click the double back arrows in the upper left to save your changes and return to the previous page

- If phone calls are included in your SafeCast subscription, review the Phone Call Settings to ensure calls are going out to all numbers. If emails are included in your SafeCast subscription, review the Email Settings if you would like an emailed copy of the "message sent report" to be emailed to anyone.
- Repeat steps 1-5 to set up a list for each situation.


Setup pre-saved messages for each situation
When a true emergency occurs, you will not want to be writing up the message to send. Take the time now to create and save messages to each SafeCast list so that when you need to send them, they are ready to go with the wording and formatting you like.
- From the My Lists page, click on the name of the SafeCast list you want to create the message for.
- From within the list, click the Create Message button
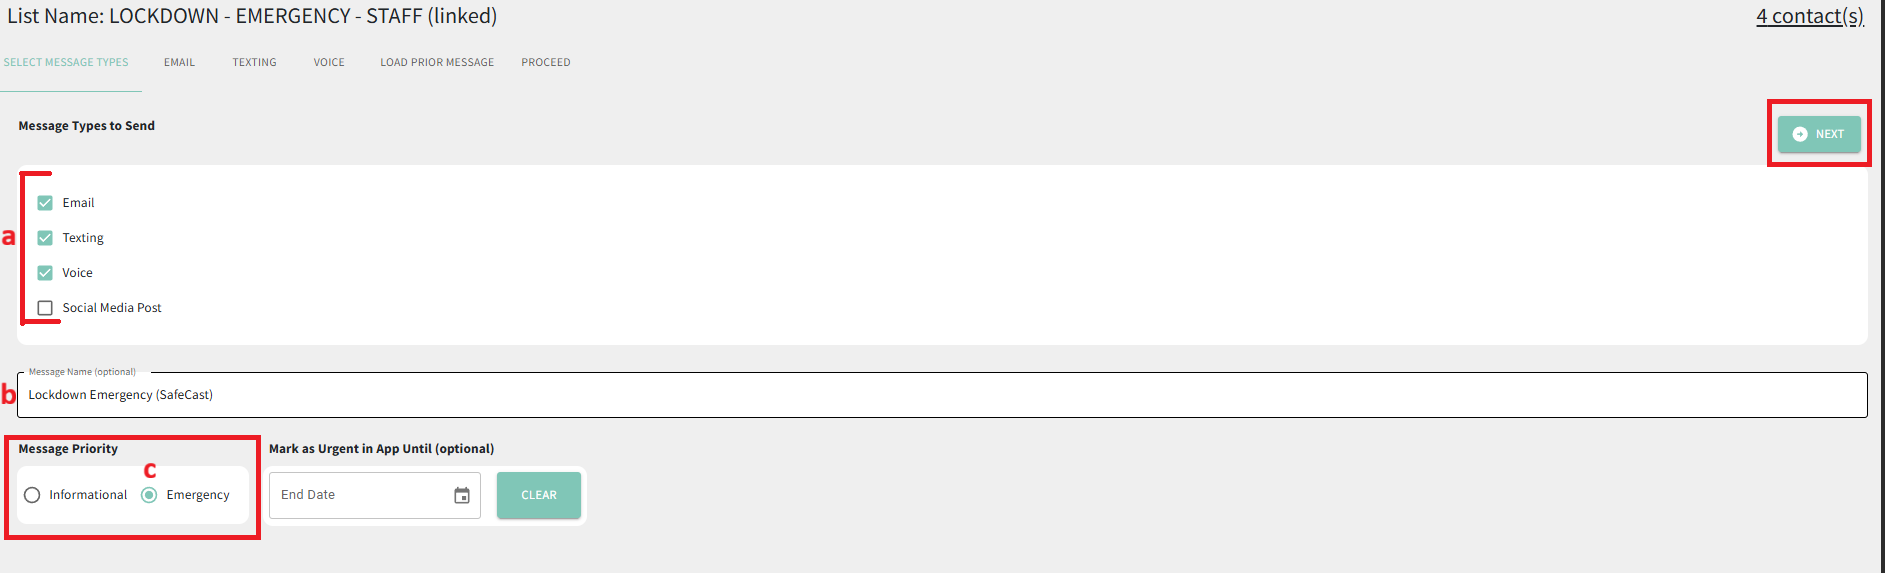
- Select your message types, name your message, and mark it as "Emergency" priority.
- Choose the message types to send and mark the corresponding checkboxes for each type. Note that all message types may not be applicable based on your SafeCast subscription. "Texting" is the most common option. If you are not sure which message types are included for your subscription, contact us.
- Name your message. While this is optional, it is highly recommended. Recipients will not see the name but it will make it easier for you to reference again in the future should you need to look at the message sent report.
- Make sure the message priority is "Emergency." That will force our servers to prioritize sending your message over any other non-emergency messages that are sending in your area at the time. It will also ensure that any contacts that are marked to receive "Emergency messages only" in your Do Not Contact list will receive the message.
- Click Next.
- Enter your email, text message, and or phone call so that it is exactly how you want it and ready to go when an actual emergency occurs. Note that all message types may not be applicable based on your SafeCast subscription.
- Click Next through the message creation screens until you get to the final "message sending" page.
- Preview the message if you wish, then click Save to save your message to the list.
- Repeat steps 1-6 for each SafeCast list


Testing SafeCast
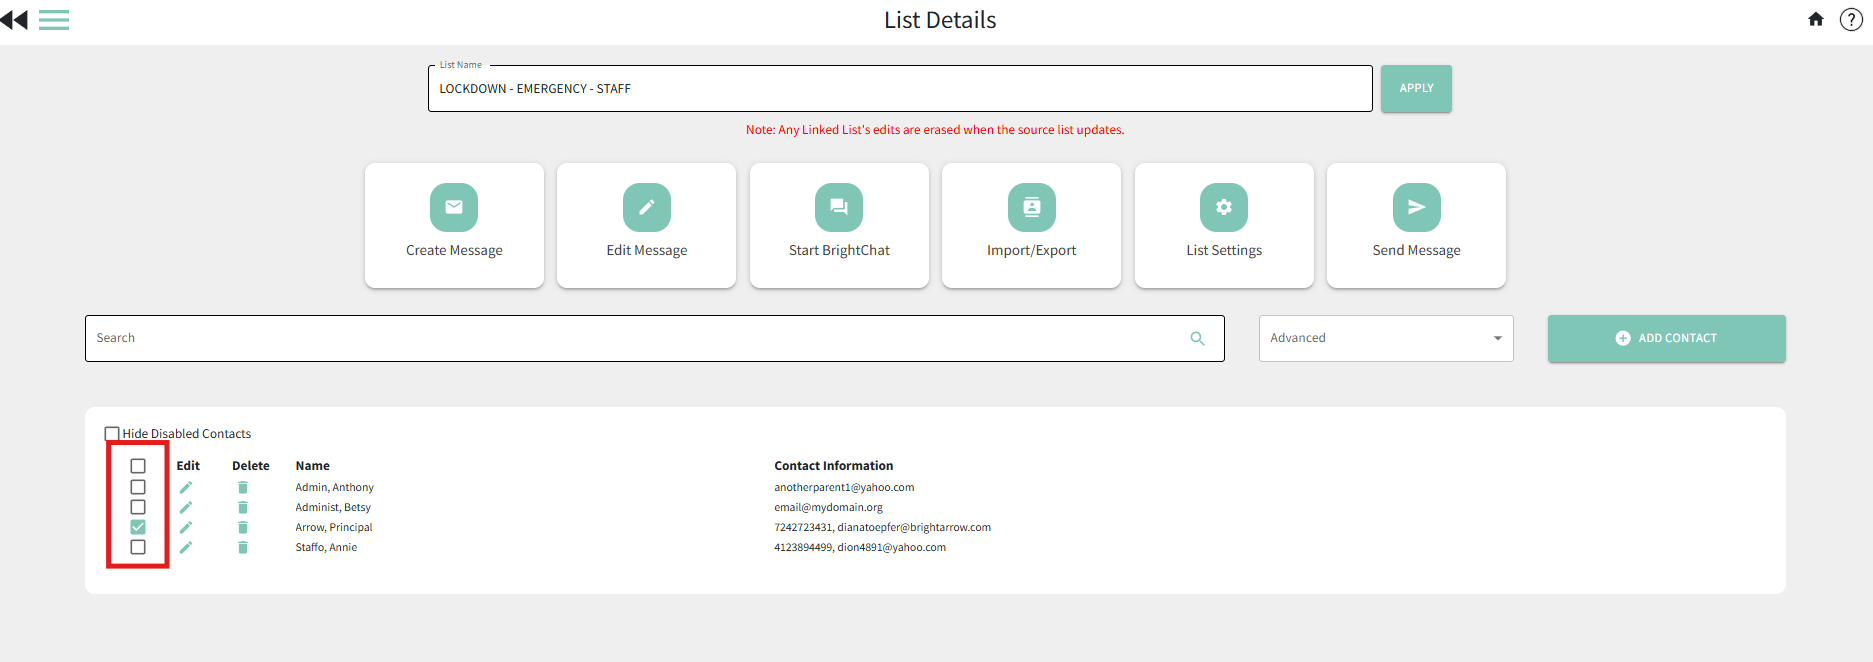
- For each SafeCast list, temporarily disable all contacts except for the one to receive the test text.
- Click the checkbox next to the bolded "edit" column header to disable all contacts.
- Mark the checkbox next to the recipient(s) who should receive the test message
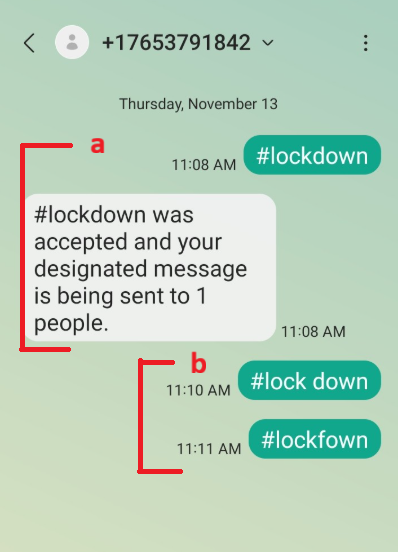
- Then from a different phone from the destination test phone (recipient), text the #keyword you set up for the list. IMPORTANT: The sender and the recipient of the test text MUST be different phone numbers.
- The phone number and keyword can be found in the List Settings > Emergency Settings
- The keyword must be texted exactly how it is entered in your list, with a hashtag in front of it. Per the above example, text #lockdown.
- The person who sent the message will immediately receive a confirmation text message saying that the keyword was accepted and the message is being sent.
- If the keyword was entered incorrectly, no confirmation text message will be sent and the SafeCast message will not be triggered.
- Make sure the destination phone received the message.
- When the test is complete, remember to re-enable all of the contacts in each of the lists by clicking the checkbox next to the bolded "edit" column header in the List Details page.
- Repeat steps 1-4 for each SafeCast list.


Using SafeCast
You can equip your users to launch SafeCast alerts by texting the predefined keywords from the BrightArrow app or using the web interface. We highly recommend that all members of your emergency response team keep the SafeCast phone number on speed-dial in their phone and also keep a list of applicable keywords somewhere that will be easily accessible when the time comes.
Option A: Text a keyword to send the alert from your mobile/cell phone
- From your favorites/speed-dial in your cell phone, choose the SafeCast phone number.
- Type and send the keyword of the situation, with a hash (#) in front of the keyword. (example #lockdown)
- You will immediately receive a text response that confirms your message is being sent.
- If you do not receive the response, you may be using the wrong keyword.
- If the #keyword is sent alone, it sends the predefined message you setup for the list. If words are added after the keywords (after a space) then the same list is used and the text typed will be appended to the end of the saved message.
- Example: if your SafeCast phone number is 510-234-3300, and if “prowler” is a keyword for a configured SafeCast list, then text #prowler to that phone number to send only the pre-saved message.
- Example: if your SafeCast phone number is 510-234-3300, and if "prowler" is a keyword for a configured SafeCast list, you can text "#prowler this is a drill" to that phone number and your saved message will send with the words "this is a drill" at the end of the message.
Option B: Send the alert from the BrightArrow app
- Go to the Apple or Android app stores and download “BrightArrow ParentHub.”
- Login as the SafeCast user group setup in the first section of this article.
- Navigate to the "Create & Send" tab.
- Tap on the SafeCast list that you want to send the message to.
- Ensure all contacts in the list are enabled (as needed). Click the "arrow" icon to send the message that is pre-saved to the list.
- In the confirmation window that opens, click "Yes" to send the message.
- Your list will now show the status "sending" to indicate that the message is being sent to your contacts


Option C: Send alert from the Web interface
- Login to BrightArrow Target Login using the Group User setup in the first section of this article.
- Navigate to the My Lists page.
- The user will see each SafeCast list. Hover over the name of the list you need to send the message to. Some icons will appear to the right of the list name. Click the "arrow" icon to send the message that was pre-saved to the list.
- In the pop-up confirmation window, click "Yes" to send the message.


