How to Create a Filtered List (Subset List)
A subset list is basically a filtered list. It is a list whose data comes from another list where certain fields match specific values. When the source list is updated linked lists, including subset lists, are also updated to get any changes that may apply to them.
Ex: You are an organization with 4 buildings/locations. You have a list that contains contacts from all 4 buildings that gets updated nightly from your main database. You can create subset lists for each building so that as people are added or removed from buildings the building lists are automatically adjusted.
What is the difference between a subset list and a copy of a list?
Both subset lists and copy lists will show as the list name and then "(linked)". However, a copy list is an exact copy of the data from the source list where a subset only has the records that match the filter criteria for the list.
Video Demo
Creating a subset list
- Navigate to the Contact Lists tab.
- Tap the "New List" button in the upper right.
- Click on the bubble for "Subset List."
- Give your new subset list a name that will clearly identify it.
- Choose one of your personal folders to add the list to if you'd like. Personal folders are there to help you stay organized. The list will automatically be added to your main "user" folder regardless.
- If you want to share the list with other users, mark the corresponding checkbox next to their name or the user group's name.
- You will always have access to the list unless you remove it from yourself intentionally.
- You can always make changes to whom the list is shared with later in the List's Settings.
- Click the bubble to "Choose a Source List," then select your source list in the pop-up window.
- The source list needs to be a list that already holds all of the contacts you want in your subset list. Your new list will be a filtered version of the source list that contains a subset of the source list's data.
- Use the search, filter, and sort options at the top of the page to easily find the source list you're looking for.
- Click anywhere in the line for your source list to select it. Once selected, a radio dial will appear to indicate it has been selected.
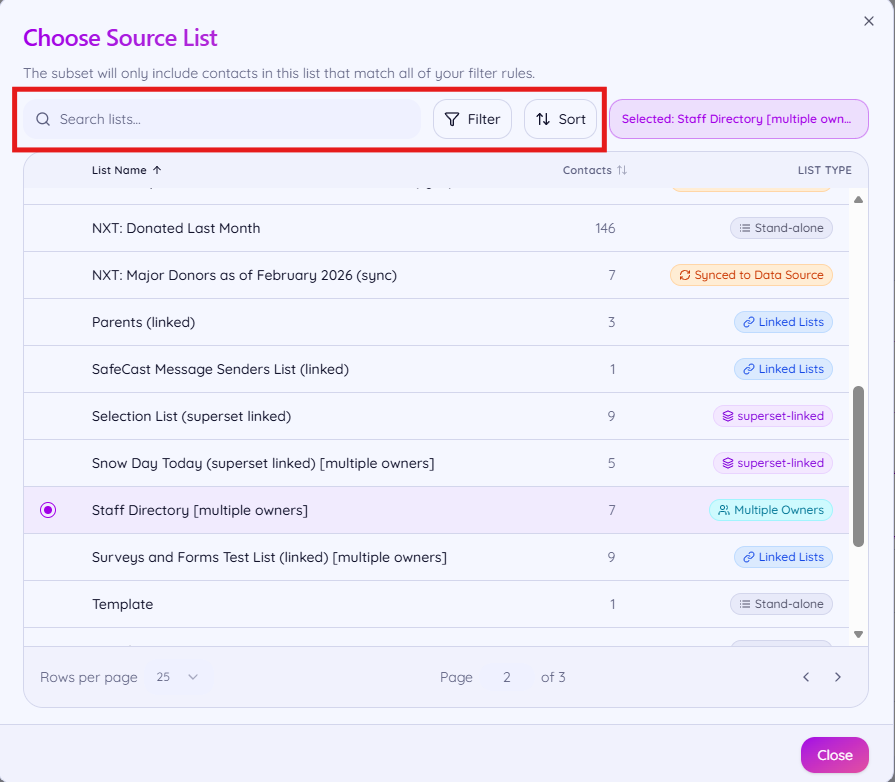
- Close or "x" out of the pop-up window to proceed. Your source list selection will be applied.
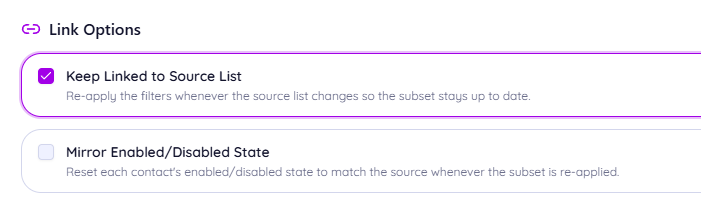
- Link options. The default settings for the link options are the correct settings 99.999999% of the time.
- Keep linked To Source List: means when the source list is updated, changes will be applied to your new list as well. You would only uncheck that box if you were trying to make a list that was static and didn't get changes over time. Schools may do this before roll over to keep a copy of the previous school year's data before roll over. Nearly 100% of the time leave this box checked.
- Mirror Enabled/Disabled State means if you disable a contact in the source list it gets disabled in this new list too. If you are trying to send a message from the source list and you unselect someone so that they don't get the message, they will be unselected in this list as well. Nearly 100% of the time leave this box unchecked.
- Add first filter using the available options. The filter options are 3 parts that together make the filter rule.

- Field: which field to use. The labels from your list will show here so your values may be different list to list depending on what your data labels are list to list. Pick the field that has the data you want to filter.
- Comparator: How do you want to compare the field to the value? Options are:
- Is equal to
- Is less than or equal to
- Is greater than or equal to
- Is not equal to
- Contains
- Contains string
- Does not contain
- Value: What is the value you are looking for. The drop down will contain all the values that currently exist in that field in your list. However, if you are trying to set up a list for a future value that isn't in the data yet you can toggle from "Pick Existing" to "Custom" at the top of the Filter Rules section. You can then enter any value you wish.
- Once you have the first filter the way you want, click Add Rule to apply it. A line item will be added at the bottom of the Filter Rules section to indicate the rule was applied.
- If you have other filters you want to add, you can keep adding them until you have all the filters you want for your new list.
- Click "Next."
- Give the new list's details a final review, then click "Create Subset."
- Depending on the size of your new list it may take a minute or two to build, but after it's made all the changes will happen in the background without anyone noticing.
- Once the list is done being created you will immediately be brought into the list's details. Here you can review the contacts, access the list's settings, etc. Notice that the list has the word (linked) at the end that you did not enter, this is automatic letting you know this list is linked to another list.
- After reviewing the details, if you need to make any changes to the filters click the "Edit Subset" button at the top of the page.


Help, my changes are gone!
If you make manual changes to the data in the (linked) subset list, those changes will be overwritten once any of the source lists are changed. If your source list is a sync list, then when that list is synced again it will update the subset and overwrite your manual changes.
To keep changes you'll want to update the source which is either the source list that is not a (sync) list OR the system that we are syncing to such as a Google spreadsheet or your student information system.
I need to edit my subset list filters
Once a subset list is created and you would like to edit the filters, you can do so from the Edit Subset button in the list.
- In Revere > Contact Lists, navigate to the subset list and click on it.
- Click on "Edit Subset" at the top.
- In the pop-up window, make any changes to your filters as needed.
- Click "Save Changes."


How can I see what filters are on my subset?
Once a subset list is created and you would like to view the filters, you can do so from the "Edit Subset" button in the list.
- In Revere > Contact Lists, navigate to the subset list and click on it.
- Click on "Edit Subset" at the top.
- At the bottom of the pop-up window, review the line items for each filter rule that is currently applied.
- Click "Cancel" or "x" out of the window if you didn't make any changes. If you did make changes, be sure to click "Save Changes."
