Attendance ToDo Feature
*BrightArrow ToDo is available to all BrightArrow customers with a full-feature BrightArrow subscription.
BrightArrow's To-Do feature lets message recipients (parents and guardians) easily track and submit items that require a response. Most commonly used for attendance-related purposes, it allows parents and guardians to submit an excuse or explanation when their child is absent or tardy. Staff can then track those responses directly in Revere, or by email if an attendance clerk has been configured for the school. The feature is not limited to attendance and can be used for any message that consistently requires a response.
This article walks through the feature end to end: how recipients submit To-Do items in the app, how administrators set up the feature in Revere, and how staff review and manage the responses that come in.
Video Demo
Administrator Setup
For your message recipients to be able to submit a response/excuse/explanation through the app, some set-up is required by your administration team. The steps below can be completed by anyone with administrator access to the full BrightArrow account. A full-feature BrightArrow subscription is required for the ToDo feature (if your organization has access to Chats through BrightArrow, the ToDo feature can be used free of cost). The initial set up is relatively easy, and after that only minor maintenance will be needed.
Step 1: Identify the Right Contact Lists
In order for a message to be designated as a "ToDo item" in your message recipients' app, the BrightArrow contact list that the message is sent from must be identified as a "ToDo" list. Identification is based on the list's name, using keywords. What matters for setup is the actual wording used in the list name (for example, “attendance,” “absences,” or “tardies”) — that wording is what will drive the Action Required To-Do behavior for messages sent to that list.
- Identify an exact keyword from the list's name: In Revere > Contact Lists, find the list(s) you would like to use for the ToDo feature to understand the exact naming conventions used. In the next step, you will use a keyword from the list's name to inform the system which lists should allow recipients to submit explanations for.
For example, if you have lists named "HS Absences" and "MS Absences" that are used to send your absence notifications, you will use the keyword "Absences" in the To-Do set-up. The keyword used must be an exact match - for example if you enter "Attendance" in the To-Do settings during set up but your lists actually have the word "Absences" in the name and not "Attendance," the lists will not be recognized as a To-Do item and recipients will not be able to use the ToDo feature in the app accordingly.
Tip! Use the search bar from the "All Lists" folder to search for all lists with a certain naming convention (ex: "Attendance"). Use the Filters option to search for all lists of a certain type (ex: "Synced to Data Source")
 Shown above: Contact lists page with side navigation, searching the All Lists folder for lists containing "Att" for attendance. Make note of the lists' names.
Step 2: Access To-Do Settings
In the previous step you made note of all list names that should be considered as a "ToDo" item list. Now you will use common keywords from those lists' names to flag them in BrightArrow/BrightHub (ParentHub) as "ToDo" items for your recipients to be able to submit responses.
- In the navigation panel, go to Settings > To-Do List.
*If you do not see an option for "To-Do List" you do not have the correct permissions to set-up the feature. Reach out to your system administrator or BrightArrow support for help.

Step 3: Configure Attendance List Keywords
There are two main setup areas on this page: Attendance List Keywords and Reply Notification Emails.
Attendance List Keywords reference the wording used in your contact list names. Any message sent to a list whose name contains one of these keywords will be flagged as an Action Required To-Do item, letting the recipient submit an excuse or explanation directly through the app. Messages from these lists still send normally through their usual channel (phone, email, text) — the keyword match simply adds the in-app To-Do option on top of that.
- Add as many keywords as needed, enter one per line
For example, if you have multiple lists with the word "Tardies" in the list name and multiple lists with the word "Absences" in the list name and want to have all messages sent to your tardies and absences lists have the ToDo option for your recipients, enter the keywords "Tardies" and "Absences" in the Attendance List Keywords box.
 |
 |
Step 4: Set Organization-Wide Reply Notification Emails
In Settings > ToDo List, you can add Reply Notification Emails to have ALL ToDo responses send to a specific email. This should be one or two addresses belonging to someone in your organization who tracks all attendance responses organization-wide — for example, a dedicated address set up by IT to keep every attendance reply on file. This is separate from the per-school attendance clerks configured in Reports (see below). Enter one email address per line; you can add as many as needed.

Step 5: Assign Attendance Clerks for each school building
With the initial set-up completed, any messages sent to any lists containing an Attendance List Keyword in the list's name will now show in your recipients ParentHub/BrightHub feed as a ToDo item, marked with an "Action Required" indicator and they will be able to submit an excuse or other explanation directly to your school. The responses submitted will show in the Attendance Responses Report and an email notification for each response will be sent to the email addresses that were added in the Reply Notification Emails section. To make sure the correct people at each school building also receive email notifications for the responses that pertain to their school's student-base, you can add them as Attendance Clerks.
Any BrightArrow user with access to the school building's user group / folder will be able to see the Attendance Responses Report for their building and be able to add Attendance Clerks for the building(s) they have access to, but only those listed as Attendance Clerks will also receive an email notification for each response that is submitted through ToDo.
- In your navigation panel, go to Reports > Attendance Responses
- In the upper right corner, select Manage Attendance Clerks
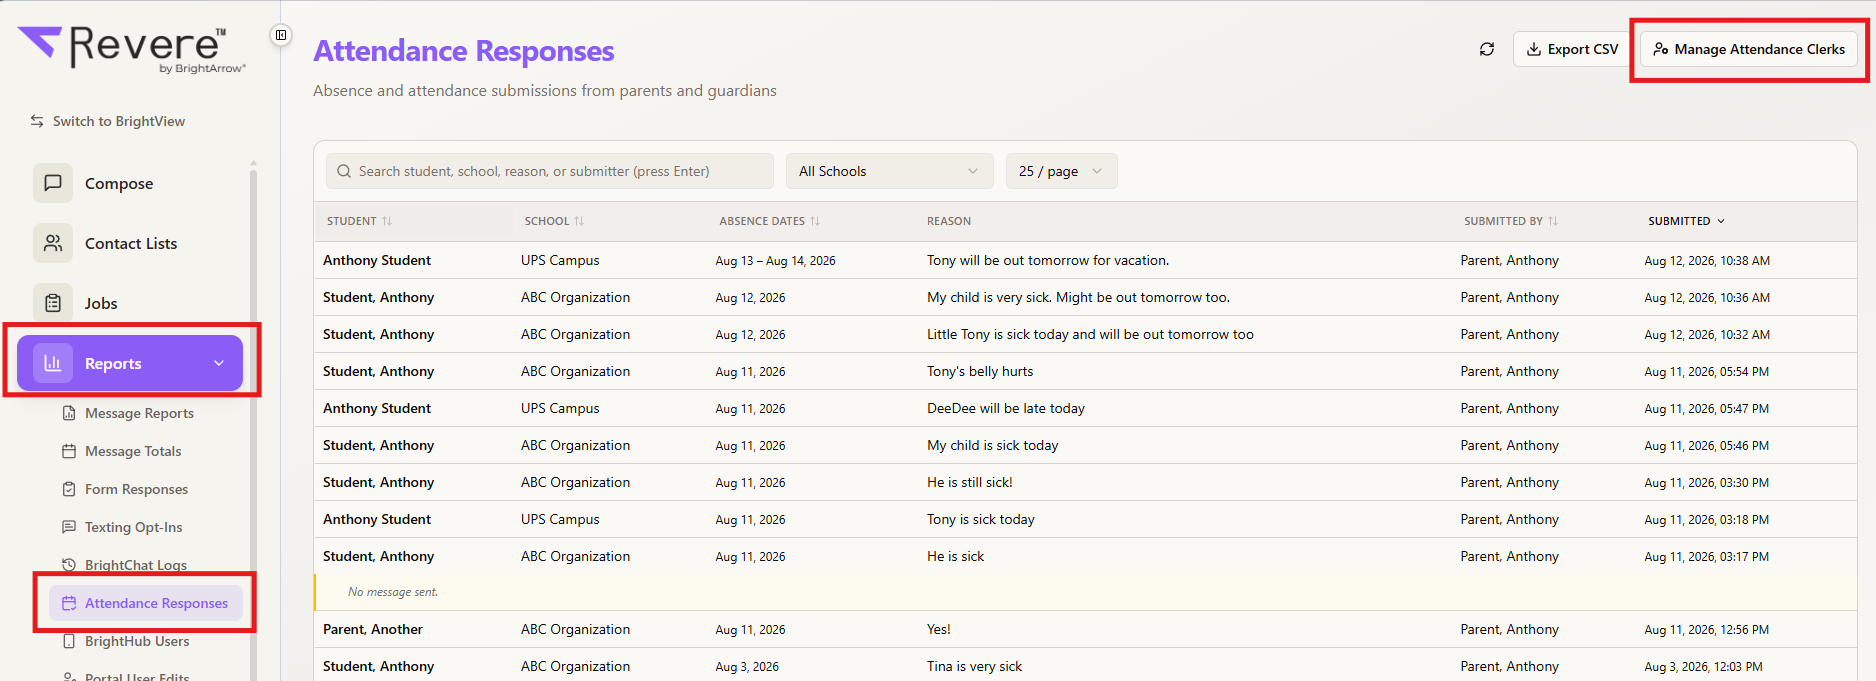
- Each of your buildings will appear in the drop-down, based on the BrightArrow user group / folder that exists for the respective school building or campus. Choose a school that you would like to add an Attendance Clerk for.
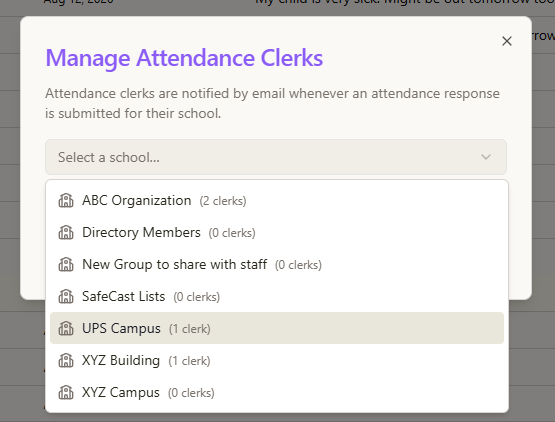
- Enter the attendance clerk's email address and click Add Clerk
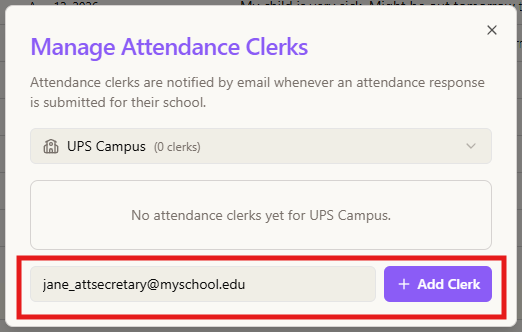
- Repeat the above steps to add as many clerks as needed per each school building; remove one at any time using the trash-can icon.
Reviewing Attendance Responses
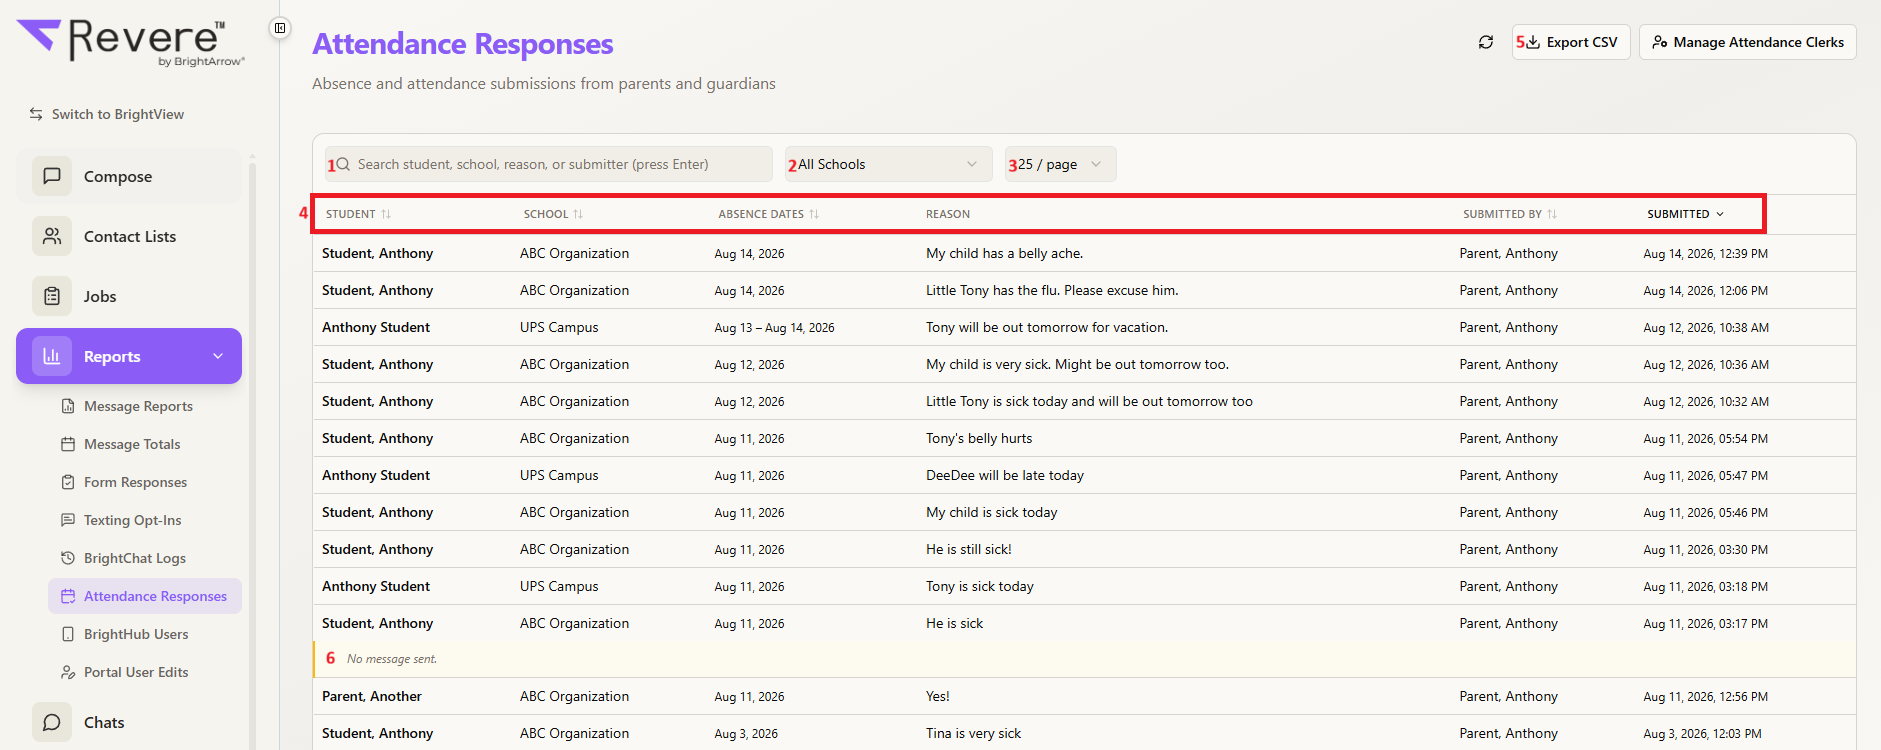
Once an attendance clerk is configured, each new To-Do response triggers an automated email notification to that clerk containing the student, school building, dates of absence, reason, and who submitted it. In the Attendance Responses report the same information also appears there and can be exported to a CSV file.
Shown below: Attendance Responses email notification received by the Attendance Clerk on file.
 Shown below: Attendance Responses Report showing the same information as the attendance responses email above.

Searching, filtering, and exporting the Attendance Responses Report
In the Attendance Responses report you can:
- Search by student, school, reason for absence, or who submitted the response.
- Apply a filter to show responses for a particular school only. *Applies to administrative users who have access to multiple buildings or user groups.
- Show additional responses beyond the default view.
- Click column headers to reorder the data (for example, by submitted date for reverse chronological order).
- Export the report to a CSV file to save in your records.
- Note: A response showing “No message sent” underneath it means no attendance clerk was configured for that school when the response was submitted. The response itself still shows in the report but the email notification wasn't sent to a clerk because there wasn't one added at the time the response was sent.
The Recipient Experience: Submitting To-Do Items
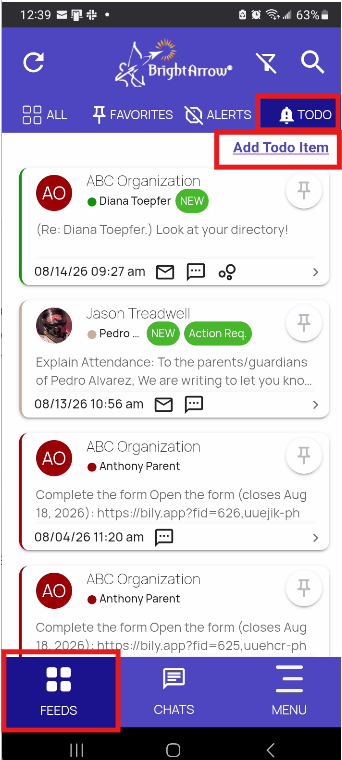
There are two ways parents can submit responses through the ToDo tab in the ParentHub / BrightHub app. If the message is sent from the school / organization, parents will receive the message as a ToDo item in their app. Tapping on the message from their Feeds or Feeds >ToDo tab will allow them to enter and submit a response. If the parent wants to proactively notify you of their child's absence, they can use the Add Todo Item link in the app to send an excuse to you.
Responding to an “Action Required” Message
If the school sends a message to a list flagged as a ToDo list (per the Administrator Setup section of this article), the recipient's Feeds tab will show the message. When the recipient taps on the message to open it they will be able to enter an explanation. Under the Feeds > To-Do tab, a message that requires a response is marked with an Action Required icon. Tapping the message from Feeds > All or Feeds > ToDo opens a box where the recipient can enter an explanation — for example, the reason their child was absent or tardy — and submit it. However, the Action Required icon will only show if the recipient is viewing the message from their ToDo tab.
Once submitted, the response appears in the Attendance Responses report, and an email notification will also be sent to an attendance clerk if one is set up for that school. For responses to Action Required messages, BrightArrow will automatically recognize the recipient's information based on the message that was sent to them so that the explanation entered will show correctly in the Attendance Responses report and an email notification will be sent to the applicable attendance clerk.
 Shown above: ToDo tab in a parent/guardian's account, showing the Action Required indicator.
 Shown above: Explanation box where the message recipient can enter their explanation or excuse, then "submit."
After submitting a response, the message in the parent's Feed will no longer show under the ToDo tab but it will show in the All tab in Feeds. Tapping on the message will reveal the parent's response to the ToDo item and no longer have the Explanation box.

Proactively Submitting a ToDo Item
Recipients aren't limited to responding to messages that were sent to them; they can also proactively submit an attendance reason at any time by selecting Add ToDo Item under the To-Do tab on their Feeds page. When submitting ToDo items proactively, BrightArrow will not automatically recognize the recipient's information to know which student or school building to reference in the Report - the parent will need to enter that information in their app to have it show correctly in the report and be delivered to the correct attendance clerk if applicable.
- To proactively add a ToDo item, the submitter will navigate in the app to Feeds > ToDo, then tap Add ToDo Item
- They will choose the student that the explanation/excuse applies to in the Student drop-down list. All students linked to the parent through their Contact ID will show. The parent will need to select the correct student. If the parent has multiple students to mark absent, they should to submit a separate ToDo item for each one.
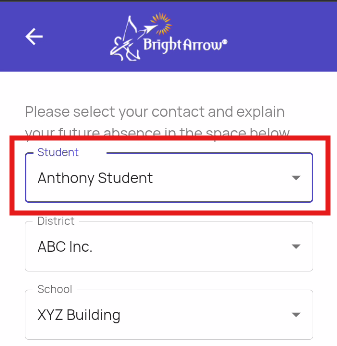
- If the parent has students in multiple districts that all use BrightArrow, they should select the district for the student the ToDo item applies to in the District drop-down box.
- The parent will choose the school building that the student in reference attends in the School drop-down box. This is needed to make sure the Attendance Responses report populates correctly and will prompt the notification email to send to the correct Attendance Clerk(s).
- The parent will enter the explanation / reason / excuse in the Explanation box.
- Enter the start and end dates as they pertain to the explanation.
- Click Submit
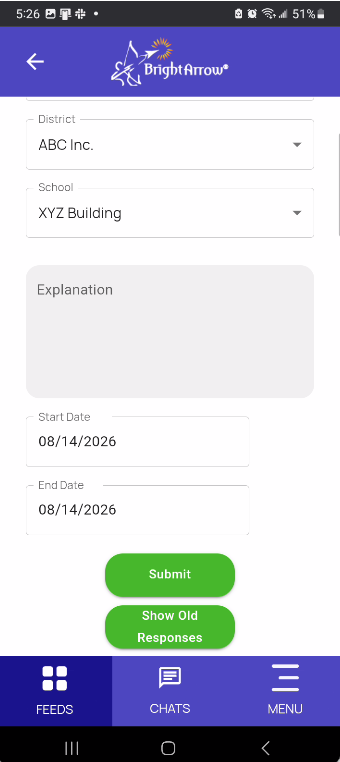
With the ToDo item now submitted, the record will show on the Attendance Responses report and send a notification email to the Attendance Clerk if there is one on file. If the parent wants to see ToDo items they previously submitted, they can tap the "Show Old Responses" button as shown in the screenshot above.
Forms, Schedules, and Chat Invites Also Appear Under To-Do
Not everything under a recipient's To-Do feed is attendance-related. BrightArrow automatically lists other actionable items there too, to help recipients keep track: a form or survey sent via BrightArrow Forms, a meeting request sent via the Scheduler, or an invitation to a new chat conversation will all appear under your recipients' ToDo tab. However, these items will not have the Action Required indicator and tapping on them does not open an explanation box — the recipient simply follows the link or takes the requested action instead. Only the messages that your organization sends from Contact Lists whose list name contains a keyword entered in the ToDo Settings will have the Action Required indicator along with the "Explanation" box.