Sending Messages through the App
Creating and sending messages is just as easy in ParentHub as it is in the user interface. BrightArrow users have access to lists, contacts, and email templates to make sending messages through ParentHub quick and straight-forward. The below instructions pertain to sending one-way messages to contacts.
How to create a new message in ParentHub
Similar to the user interface, you have the option in ParentHub to send a message to one list or to multiple lists.
Sending a message to one list
- Navigate to the Create & Send tab within ParentHub.
- Tap on the name of the list you would like to send a message to.
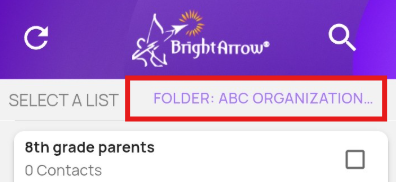
- If you don't see the list you're looking for immediately, you may need to change the folder that you're viewing.
- The app will default to your most recently used folder as long as you have the "Remember Me" checkbox marked when you login. The "Remember Me" box is marked by default on the login screen.
- Tap "Create" to create a new message.
- Select the type(s) of message you want to send, then tap "Next."
- Design your message.
- Email
- Review the email header and change the From Name, From Email, and Subject as needed.
- Design your message in the email editor box. Use the editing toolbar to make the message look how you want it.
- If you want to add an attachment to the email, tap "Upload Attachment" and select the file from your device.
- For help applying a template to the email, see here.
- When you are finished designing your email, tap "Next."


- Text (SMS)
- If you also created an email message, the verbiage will automatically be added to the text message creation box. Make any changes as needed.
- When you are finished writing your text message, tap "Next."

- Voice (phone call)
- The voice message page will give you the option to use the computer-generated voice or a recorded voice message. Use the toggles to choose your preferred method.
- If you choose computer-generated voice message and have already designed an email or text message, the verbiage will automatically be added to the voice message creation box. Make any changes as needed.
- To record a voice message, tap the "Record Message" button. The app will prompt you with options to record your voice or import an audio file. Once you've finalized your voice message, tap "Apply."


- When you are finished editing / recording your voice message, tap "Next."
- The voice message page will give you the option to use the computer-generated voice or a recorded voice message. Use the toggles to choose your preferred method.
- Email
- Send, save, or schedule your message.
- Send message now sends the message immediately.
- Save message saves the message to your list so you can edit and send it later.
- Schedule message allows you to choose a different date/time to send the message.


Sending a message to multiple lists
- Navigate to the Create & Send tab within ParentHub.
- Tap the checkboxes to select each list you would like to send a message to.
- Tap Select an Action > Create a new message.
- Tap OK.
- A new window will appear showing the lists you selected. Tap Confirm.
- Select the type(s) of message you want to send, then tap "Next."
- Design your message.
- Email
- Review the email header and change the From Name, From Email, and Subject as needed.
- Design your message in the email editor box. Use the editing toolbar to make the message look how you want it.
- If you want to add an attachment to the email, tap "Upload Attachment" and select the file from your device.
- When you are finished designing your email, tap "Next."
- Text (SMS)
- If you also created an email message, the verbiage will automatically be added to the text message creation box. Make any changes as needed.
- When you are finished writing your text message, tap "Next."
- Voice (phone call)
- The voice message page will give you the option to use the computer-generated voice or a recorded voice message. Use the toggles to choose your preferred method.
- If you choose computer-generated voice message and have already designed an email or text message, the verbiage will automatically be added to the voice message creation box. Make any changes as needed.
- To record a voice message, tap the "Record Message" button. The app will prompt you with options to record your voice or import an audio file. Once you've finalized your voice message, tap "Apply."
- When you are finished editing / recording your voice message, tap "Next."
- The voice message page will give you the option to use the computer-generated voice or a recorded voice message. Use the toggles to choose your preferred method.
- Email
- Send, save, or schedule your message.
- Send message now sends the message immediately.
- Save message saves the message to your list so you can edit and send it later.
- Schedule message allows you to choose a different date/time to send the message.


How to select specific contacts to message
In the user interface, you can select specific contacts from your list and send a message only to them. The same functionality exists in ParentHub.
- From the "Create & Send" tab, tap the name of the list that contains the contacts you need to message.
- Tap the checkboxes next to each contact to select or deselect them as needed.
- The "Enable All" checkbox can be used to select or deselect all list contacts. This may be helpful if you are selecting only a few individuals from large list of contacts.
- Remember that your selection will save to your list. Changes made within your lists in ParentHub will also be applied to your account in the user interface.

- Proceed with your action of creating, editing, or sending a message.
