Using Mail Merge Fields to Add Dynamic Information into Messages
You may add different pieces of information into a message to make it more personal. When typing them in they will all be in the format of [[something]]. We’ll separate these into 2 different groups.
Universal Fields
These fields are the same across all lists for all customers. They are:
- [[firstname]]
- [[lastname]]
- [[fullname]]
- [[today]]
- [[tomorrow]]
- [[contactid]]
- [[groupname]]
- [[username]]
Custom Fields
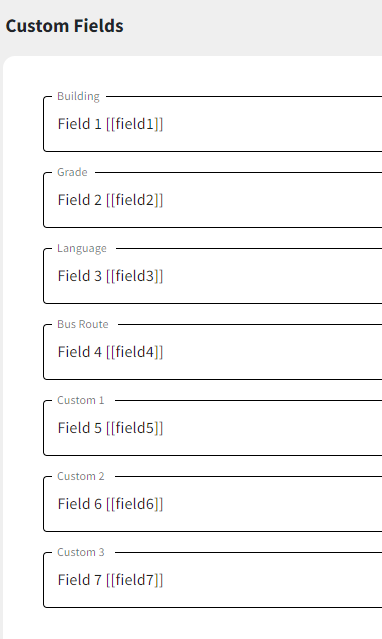
These fields will change depending on what is put into them. In many cases we’ll have changed the labels to match the data being tracked. The [[field1]] … [[field7]] values appear on the right side of a record just below the Portal Login. Specifically, [[field1]] is “Building,” etc. Custom fields cannot be created by administrators or users. If you would like to set up custom fields, let us know by emailing gettechsupport@brightarrow.com.
Ways of adding merge fields
Now that you know how to identify the merge fields, how do you add them into your message? There are 3 ways to do this.
- Type them in by hand. If you want the first name in the message, simply typing [[firstname]] into your text will insert that field.
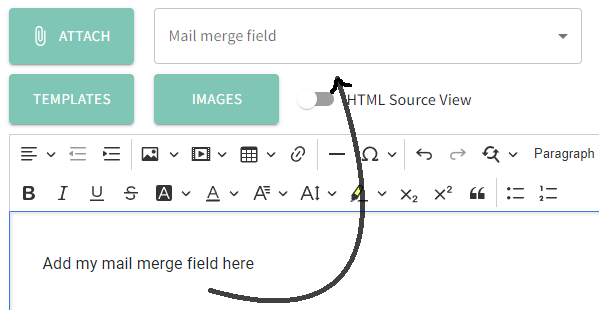
- Add them using the drop down. They are located here:
- In a multi-part message, there is an option in the second box to add merge fields. Select Mail Merge Field as the option and then pick the field you want to insert. Once selected, click Add Message Part in order to insert it. This method is really only needed for inserting merge fields into a recorded voice message. Other message types, including email, text message, and computer voice message, can simply use the hand-typed method or select from the drop-down menu as detailed above.

Example
Below is an example of how you might use dynamic fields in a message.
To the parent/guardian of [[firstname]],
Today, [[today]], [[firstname]] was absent during period(s) [[field5]]. If this is a legal absence please email or call the attendance office.
Thank you,
Fake High School