Navigating Contact Lists in the Revere Message Center
In the Revere Message Center, your Contact Lists page is where you can find your lists and folders and view all information for your contacts. In this article we will cover everything you'll see in the Contact Lists tab. For help with reviewing and editing your contacts within a list, see here.
Getting to your Contact Lists
To get to your Contact Lists, in the Revere Message Center click on the Contact Lists tab on the left.

How to find the lists you need
By default, all of your lists will be shown in a grid format like in the screenshot above. If you'd rather see your lists in a table format, click "View as table."

 You can scroll through your lists to find what you need or use the search options to find what you're looking for.
- If you know the name of the list you're looking for, use the search bar at the top of the page to search for it.
- Narrow down the number of lists you're viewing by searching within a specific folder. You can click directly on one of your folders in the bar. Use the navigation arrows on either side of that bar to scroll through your folders.
- OR search for a specific folder by clicking "Browse All." A pop-up window will show all of your folders. Click directly the folder you want to view or use the search bar at the top of the window to search for a specific folder by name.


What do the different icons mean?
Whether you're viewing your lists in the grid format or the table format, you might notice some different icons associated with them. Here we will show you what each icon indicates.
Message bubble icon
There are a number of benefits that come with having a message stored in a list. You can create lists that are dedicated for a specific purpose and easily send the saved message at any time. Some examples are for emergency messages, attendance messages, and newsletters. The messages that are saved to a list can easily be sent right away or edited before you send them. Having a message saved to a dedicated list helps to save time when the situation arises and you need to quickly review and/or send your message.
The message bubble icon is basically a direct link to the message that is stored in your list. If you create a message and save it to the list, you will then see the message bubble icon. Some lists will show a message bubble icon and some will only show the icon when you hover over the list with your mouse. In both cases, the icon is clickable and will allow you to edit the pre-existing message or create a new one.
Message bubble icon already showing:
If the message bubble icon is showing without you needing to hover over the list name, that indicates that there is a message already created and saved within that list. This can be very helpful for messages that you will send to the same list over and over again. For any list that has the message bubble icon already showing, you can click the icon to do any of the following:
- Manage Message: Brings you to the message editing page to make any changes to your message and send it if you wish. Note that you will not be able to change the contact selection or choose additional contact lists from this screen.
- Send Message Now: Immediately send the saved message to that list.
- Schedule Message: Choose a future date/time to send your message to that list.
Grid View:

Table View:
 Message bubble icon not showing:
If your message bubble icon is not already showing on your list, that indicates that there is no message saved to the list. If you hover over the list, the message bubble icon will appear. You can click on it to start creating a message within the list.
Grid View:


Table View:


Star icon
You may notice the star icon on each list as shown below. If the star is filled in (all white), that means the list is also in your favorites folder. If the star is empty (just the outline), that means the list is not included in your favorites folder.
Table View:
 Grid View:

Numbers under the list's name
Under the name of each list, you will see the number of contacts that are included in that list.
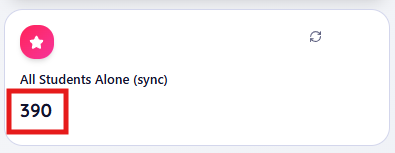
- A single number indicates that all contacts in the list are enabled. In the example below, the "All Students Alone (sync)" list contains 390 contacts and all of them are enabled. Only enabled contacts will be considered to receive the message you send to the list.
Table View:

Grid View:
- Two numbers shown as # / # indicate that not all of the contacts in the list are enabled. The first number indicates the number of enabled contacts and the second number indicates the total number of contacts in the list. Only enabled contacts will be considered to receive the message you send to the list. In the example below, the "All Students Alone (sync)" list has a total of 390 contacts but only 377 of them are enabled. If a message is sent to that list, only the 377 enabled contacts will be sent the message.
Table View:

Grid View:

For more help enabling / disabling contacts within your list, see here.
3 vertical dots
If you hover over any list, 3 dots will appear. If you click on them you will be able to add that list to one of your personal folders. Folders can help you organize your lists to make the lists easier to find again in the future. There is no limit to how many folders you can have. Once you click the option to add the list to a folder, you will be prompted with a list of your existing folders so you can choose which one to add the list to.
Note that this option is only to add your list to one of your personal folders. These folders are different than some of the group folders you may see where users can share the lists within them. These folders are for your personal use to help you organize your lists. For more help understanding folders, see here.
Grid View:


Table View:


List types
The Revere Message Center uses icons to help indicate what type of list you're looking at. Understanding the various types of lists can help you get an idea of how the list was set up and if it has been shared with anyone else in your organization. This information can also be helpful if you need to use the Filters option on the Contact Lists page to review and find your lists based on the type of list. For additional information regarding list types, see here.
In the grid view, the list types are shown as icons in the upper right corner for any list:
 In the table view, the list types are shown in the "Type" column located to the right:

- Sync List: These are the main lists that import data from another system like a SIS, HR database, or Google spreadsheet. Sync lists are overwritten each night with up-to-date information in your other system.

- Linked List: Linked lists are lists that intake data from other BrightArrow lists. When the original list is updated, any changes flow down to the linked list so the linked list updates also.

- Superset Linked: Superset lists are lists that were compiled as a combination of lists, basically a list that is made up of multiple other lists.

- Multiple Owners: The list is shared with other users. More than one BrightArrow user has access to the list.

- Free Portal: (uncommon) A community portal list that contains contacts who have registered to receive notifications through your community portal.


