Appointment Scheduler
With BrightArrow, you can create and send meeting invitations through the Scheduler feature. The Scheduler feature needs to be enabled for your organization. If it is not enabled and you are interested in using it, please contact us.
Scheduler can be used through the BrightArrow web interface (BrightView) or in the ParentHub app. This article focuses on using Scheduler in BrightView. For instructions on using the feature in the ParentHub app, see here.
How to see if Scheduler is enabled for your organization
If you are a BrightArrow superadmin, you can quickly see if Scheduler has been enabled for you by reviewing the status in the menu.
- From the BrightArrow Central homepage, click the 3 horizontal bars in the upper left of the screen to access the menu.
- Under the ParentHub Customization section, click "Enable Scheduler."
- In the pop-up window, adjust the toggle to enable/disable Scheduler.
- If the toggle is turned OFF, no users in your organization will have access to the Scheduler.
- If the toggle is turned ON, users in your organization will have access to the Scheduler.


Creating a meeting invite
- Login to the BrightArrow web interface, BrightView.
- From the BrightArrow Central homepage, click the 3 horizontal bars in the upper left of the screen to access the menu.
- Click Appointment Scheduler.
- To start creating a meeting, click the Add Appointment Type button.
- A "Schedule Appointment" window will pop-up. In the Appointment Type box, give your meeting a title. Your recipients will see this when the open the link to schedule the meeting.
- Enter a meeting location and any additional notes. Your recipients will see this when the open the link to schedule the meeting.
- Choose a time length for each individual appointment by using the drop-down options in the Meeting Duration box. This is how long each individual meeting will last.
- If you're sending invites to schedule multiple meetings, you can add a Delay Between Meetings by choosing from the available options in the Delay Between Meetings box. This is the amount of "down time" you'll have in between each individual meeting. Selecting 0 minutes means that your meetings can be scheduled back-to-back.
- Choose a date for your meeting by clicking the "Add Date/Time" button at the bottom of the window. If your meetings can be scheduled on more than one date, you'll be able to choose the next date later.
- The current date will populate in the Start Date box.
- Click inside the box to manually enter the date for which your meeting(s) will be held.
- Click the calendar icon to select the date from a calendar. Use the navigation arrows at the top of the calendar picker to choose a date from a different month or year.
- If you plan to allow your recipients to choose from multiple dates, you will be able to add additional dates later.
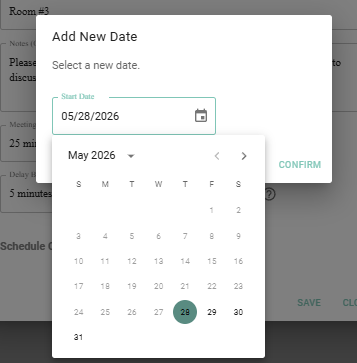
- With your first meeting date now entered, click Confirm.
- You can now block out the time(s) for your meetings to take place. With your date now selected, you will see Start and End times appear on your screen. Click inside the Start or End block respectively to change the time.
Example: You are inviting recipients to schedule 25-minute long meetings with you, but all those meetings need to take place between 3:00pm and 7:00pm. Here you will block out the 3:00-7:00 time slot and each individual recipient will schedule a 25-minute meeting within that 4 hour block of time.
- You can manually enter the time by clicking on the digital clock format (numbers).
- Click on the clock icon to select a time from a list of options. Remember to select either AM or PM to indicate a morning or afternoon time as well.
- If you are scheduling only one meeting, use the start and end time boxes to enter the exact time for that meeting.
- If you are sending invites to schedule multiple meetings in one day, use the start and end time boxes to block out the entire time that you will be available for appointments.
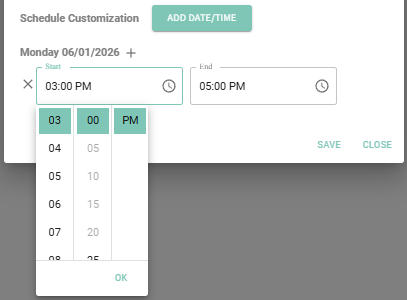
- Use the + icon to add an additional time block for that day's meetings, then repeat step #12 above to create the next block of time. Add as many blocks as you wish.
Example: You are inviting recipients to schedule 25-minute long meetings with you. Meetings can be scheduled any time throughout your work day but you need a 1 hour break for lunch between 12:00pm and 1:00pm. Create the first time block for your morning meetings before your lunch break, then use the + icon to add an additional block of time from 1:00pm to 5:00pm. This way, meetings cannot be scheduled during your lunch hour. - If you need to remove a time block, click the X that shows before the Start time for that block.
- If you need to add timeslots for an additional date to the meeting, tap the Add Date/Time button again to add subsequent days and times.
Example: You are inviting recipients to schedule 25-minute long meetings with you for a mid-year conference. You can host these meetings on June 1st at any time except for your lunch break, and you are also available for the meetings during the morning of June 2nd. - With your first date and time blocks added, click the Add Date/Time button again and choose the second date that you are available to host the meetings.
- Repeat steps #9-13 as detailed above to choose your second date and add your time block(s) to it. Repeat those steps until all dates and time blocks for your meeting are entered. You can add as many dates and time blocks as you need.
- With all meeting details now added, click Save in the bottom of the window. Note: Clicking Close will delete your meeting. You will not be able to pull it back up to work on it more later. Be sure to click SAVE if you want to save any changes (you can always edit it later before sending).
- After clicking Save, you will now see the appointment on your Appointment Schedules page in BrightView. It will also appear under Menu - Scheduler in your ParentHub app. See below for help sending the meeting request to your recipients.


Sending the meeting invite
Once you have created and saved the appointment schedule, you can now send it to your contacts. There are multiple ways to go about sending the meeting request. For help sending meeting invitations through the ParentHub app, see here.
- If you are already in the Appointment Schedules page, in the same row as the meeting you want to invite your contacts to click the icon that looks like an arrow with a clock on it. You will be redirected to the My Lists page. If you are not already in the Appointment Schedules page, start at the My Lists page.
- Mark the checkbox next to the list(s) you would like to send the invitations to.
- Click the Select an Action button.
- Choose the option to Schedule Appointments.
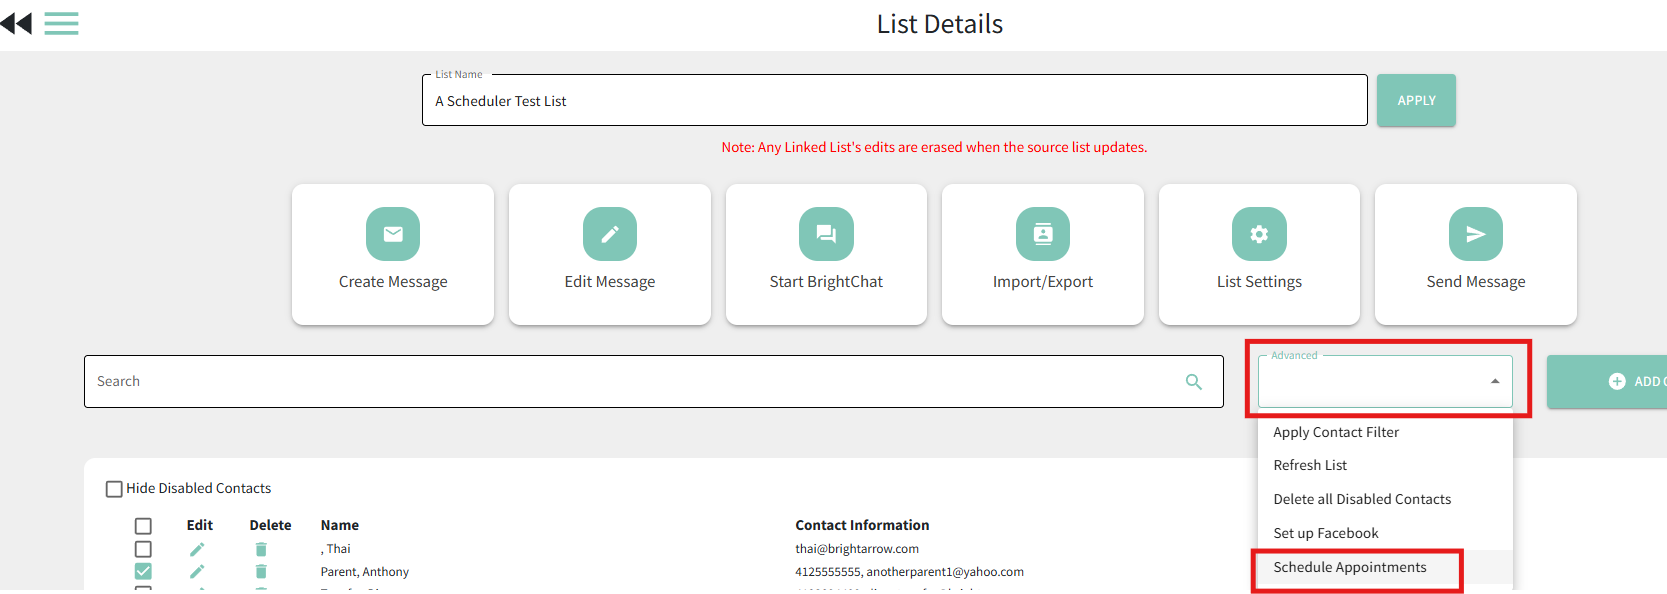
- Alternate option: If you need to review, enable, or disable contacts in your BrightArrow list before sending the invitation and you are already in the List Details page, you can get to the "Schedule Appointments" screen directly from there.
- Click the Advanced drop-down.
- Select "Schedule Appointments"
- In the pop-up window, find the appointment you wish to send. In the same row as the appointment you are sending invitations for, click the icon that looks like an arrow with a clock.
- The window will open with all appointments that were "last updated" during the current month. Use the Month/Year navigation arrows to find appointments that were updated
- You can use the search bar to help narrow down the results to find the meeting you want to send invitations for.
- The message creator screen will open for you to create the email message to send your meeting invitation to. Meeting invitations can be sent by email.**
**Meeting invitations can be sent via Text message ONLY if your organization uses BrightArrow's short code (#79041) for sending text messages. This encompasses most customers located in the continental United States. If you are not sure if text messages from your organization are sent through the number 79041, please contact us.
- Add a Message Name if you wish, then use the Next button to view and edit your message.
- A standard message has been pre-populated for you, but you can edit it however you wish with the exception of changing the actual link. Once you have the message to your liking, click Next.
- Send, save, schedule, or preview your message using the options on the screen.


How to preview the meeting before sending it
If you'd like to see what the meeting invitation will look like for your recipients, you can preview it before you actually send it out. You can preview the appointment right before you send it (as shown in the section above), or you can preview it from the Appointment Schedules page.
- In BrightView, go to Menu > Appointment Scheduler
- Find the appointment you would like to preview.
- In the same row as that appointment, click the icon that looks like a calendar with an eye in it.
- A new tab will open in your browser where you can see exactly what your recipients will see. Click on a "date" to view the available time periods that can be scheduled.


How to see who is scheduled to meet with you
You can see who scheduled an appointment with you. You can view the appointments specifically for one meeting, or you can view all appointments that are scheduled with you across all meetings. The instructions below focus on how to view scheduled appointments through the BrightArrow web interface, BrightView. For help viewing scheduled appointments in the ParentHub app, see here.
Viewing all appointments scheduled within a specific "meeting"
If you want to see everyone who scheduled an appointment with you in regard to a specific meeting invitation you sent, follow the instructions below.
Example: You created a meeting for "Conferences" and you want to see everyone who scheduled a timeslot to meet with you for the conferences. You also created a meeting for "Annual Reviews" but you don't want to see those scheduled appointments right now. You are only concerned about the "Conferences" right now.
- Login to BrightArrow and navigate to Menu > Appointment Scheduler.
- You'll see a listing of all the meetings you've created. Find the one you want to see scheduled appointments for. You can use the search bar at the top of the page to help narrow your results. You can search by the meeting's title (type) or location. If you don't see the meeting, use the Month/Year navigation arrows to move to a different month to locate the meeting.
- In the same row as the meeting you want to view the scheduled appointments for, click the icon that looks like a calendar.
- You will now see the Scheduled Appointments page that shows details for each timeslot that is scheduled for your meeting.
- How to read the page / available options:
- Month/Year navigation: If your meeting spans multiple months, use the navigation arrows to view the meetings that are scheduled during the month shown. For example, some contacts scheduled an appointment on June 30th and others scheduled on July 1st. Use the arrows to see scheduled appointments for each month respectively.
- No.: A numbered list to make your appointments easier to manage. Meeting Time: This is the time the specific appointment will take place.
- Type: This is the title you added to the meeting when it was created.
- Location: This is the location you entered for the meeting when you created it.
- Name: The name of the person you are meeting with - whatever name they provided for themselves when they scheduled the appointment with you.
- Regarding: This is who you are meeting on behalf of, such as the name of the student or dependent.
- Email: The email address for the person you are meeting with as they entered it when they scheduled the appointment.
- Status: If the status is blank, that indicates there is nothing "special" to report. You should plan on meeting with them. A status of "Cancelled" means the person you're meeting with cancelled their appointment for that specific timeslot.
- Last Update: The last time you OR the person you're meeting with updated the appointment. There may have been notes added, or the recipient may have cancelled it.
- Action item: Notepad icon: To see any notes that you OR the person you're meeting with entered for the meeting, tap the icon that looks like a notepad.
- Action item: Download icon: To download the meeting to add to your personal calendar, click icon that looks like a downward pointing arrow with a line underneath.
- Action item: Envelope icon: To send a reminder to the person you're meeting with, click the icon that looks like an envelope with an arrow at the bottom. Note that you and the person you're meeting with will automatically be sent a reminder via email 24 hours prior to the scheduled meeting. You only need to use the reminder envelope if you want to also manually push out a reminder.
- Action item: Circled X icon: If you need to cancel the appointment for that specific timeslot, click the icon that looks like a circle with an X in it.


Viewing all appointments scheduled for all "meetings"
If you want to see everyone who has an appointment scheduled with you regardless of which meeting they signed up for, follow the instructions below.
Example: You created two meetings, "Conferences" and "Annual Reviews," and you want to see all scheduled appointments for both of them at the same time.
- Login to BrightArrow and navigate to Menu > Appointment Scheduler.
- You'll see a listing of all the meetings you've created. Click the View Appointments button in the upper right of the screen.
- The Scheduled Appointments page will open to the current month. Use the Month/Year navigation arrows to review scheduled appointments for a different month.
- How to read the page / available options:
- Month/Year navigation: se the Month/Year navigation arrows to review scheduled appointments for a different month.
- No.: A numbered list to make your appointments easier to manage. Meeting Time: This is the time the specific appointment will take place.
- Type: This is the title you added to the meeting when it was created.
- Location: This is the location you entered for the meeting when you created it.
- Name: The name of the person you are meeting with - whatever name they provided for themselves when they scheduled the appointment with you.
- Regarding: This is who you are meeting on behalf of, such as the name of the student or dependent.
- Email: The email address for the person you are meeting with as they entered it when they scheduled the appointment.
- Status: If the status is blank, that indicates there is nothing "special" to report. You should plan on meeting with them. A status of "Cancelled" means the person you're meeting with cancelled their appointment for that specific timeslot.
- Last Update: The last time you OR the person you're meeting with updated the appointment. There may have been notes added, or the recipient may have cancelled it.
- Action item: Notepad icon: To see any notes that you OR the person you're meeting with entered for the meeting, tap the icon that looks like a notepad.
- Action item: Download icon: To download the meeting to add to your personal calendar, click icon that looks like a downward pointing arrow with a line underneath.
- Action item: Envelope icon: To send a reminder to the person you're meeting with, click the icon that looks like an envelope with an arrow at the bottom. Note that you and the person you're meeting with will automatically be sent a reminder via email 24 hours prior to the scheduled meeting. You only need to use the reminder envelope if you want to also manually push out a reminder.
- Action item: Circled X icon: If you need to cancel the appointment for that specific timeslot, click the icon that looks like a circle with an X in it.


How to close down a meeting so no more appointments can be scheduled for that meeting
If you already sent out meeting invitations to your recipients but now are unable to host the meeting, you can close it. Any time slots that have already been scheduled will still need to be cancelled, but by closing the meeting you will stop anyone else from scheduling appointments for that meeting.
Example #1: You sent out a meeting invitation to your recipients, but afterward you realized that you had PTO that day and will have to host your meetings on a different day.
Example #2: You sent out a meeting invitation to 30 recipients thinking that you could host all 30 meetings in a single day. Now that you see 15 meetings on your calendar, you want to stop anyone else from being able to schedule on that day. You plan to create a second meeting date for the remaining 15 recipients to schedule.
- Login to BrightArrow and navigate to Menu > Appointment Scheduler.
- The Appointment Schedules page will open to the current month. You can use the Month/Year selection arrows at the top of the page to find a meeting that is scheduled in a different month. Find the meeting you wish to close.
- In the same row as the meeting you want to close, click the toggle located in the "Status" column.
- In the pop-up window, confirm that you would like to close the meeting by clicking OK.
- The meeting will now show with a strikethrough. Your recipients will no longer be able to schedule an appointment within that "meeting."
- If you need to re-open the meeting to allow others to schedule, you can click the toggle in the "Status" column again to re-open it.


How to cancel a meeting
If your recipients have already scheduled a meeting with you but you need to cancel it, you can cancel individual appointments. *If you need to fully cancel ALL scheduled appointments, we recommend that you first "close" the meeting by following the instructions above to make sure no one new schedules an appointment. You can then go through and cancel each scheduled appointment.
- Login to BrightArrow and navigate to Menu > Appointment Scheduler.
- You'll see a listing of all the meetings you've created. Find the one you want to see scheduled appointments for. You can use the search bar at the top of the page to help narrow your results. You can search by the meeting's title (type) or location. If you don't see the meeting, use the Month/Year navigation arrows to move to a different month to locate the meeting.
- In the same row as the meeting you want to cancel, click the icon that looks like a calendar.
- The Appointment Schedules page will open to the current month. You can use the Month/Year selection arrows at the top of the page to find a meeting that is scheduled in a different month. Find the meeting that contains the appointment you wish to cancel.
- Locate the specific appointment you want to cancel. In the same row as that appointment, click the icon that looks like a circle with an X in it.
- In the Appointment Cancellation pop-up window, enter a note to state why you are cancelling the appointment. Both you and the person who had scheduled the meeting with you will be able to view the note. Once your note is entered, tap "Cancel Appointment."
- The appointment will now show the status: Cancelled.
- An email will be sent to you and the other party to notify them of the cancelled appointment. The note you entered will be sent in that email.


Appointment reminders
By default, the meeting host and the attendee will each receive an automated reminder via email 24 hours before the scheduled appointment time. If you want to send an additional reminder to the person you're meeting with, you can do that too.
- Login to BrightArrow and navigate to Menu > Appointment Scheduler.
- You'll see a listing of all the meetings you've created. Find the one you want to send a reminder to. You can use the search bar at the top of the page to help narrow your results. You can search by the meeting's title (type) or location. If you don't see the meeting, use the Month/Year navigation arrows to move to a different month to locate the meeting.
- In the same row as the meeting you want to cancel, click the icon that looks like a calendar.
- The Scheduled Appointments page will open to the current month. You can use the Month/Year selection arrows at the top of the page to find a meeting that is scheduled in a different month. Find the meeting that contains the appointment you wish to send a reminder to.
- In the same row as that appointment, click the icon that looks like an envelope with an arrow at the bottom.
- Click OK in the pop-up window to send an appointment reminder to the recipient's email address that is listed on the Scheduled Appointments screen.
- You'll see another pop-up to let you know the appointment reminder was sent. Click OK again.
- Your recipient will receive the reminder in their email inbox.


