Blackbaud Lists for Blackbaud EMS
With Blackbaud Lists in BrightArrow, users can create basic, advanced, and Raiser's Edge NXT Constituent lists using nearly any data point in Blackbaud. Your lists will be available right away in BrightArrow for you to send messages to. This article reviews the Blackbaud Lists feature using Blackbaud EMS and creating a "Basic" list. For help with the Blackbaud Lists feature for a Raiser's Edge NXT Constituent List, see here.
In order to enable the Blackbaud Lists feature in your account please contact us.
Key features of Blackbaud Lists
- Synced lists: With synced lists, you build the list one time and it automatically updates each night with your recipients' current information so there is no need to manually update any contact information in the BrightArrow list itself. You enter the information in Blackbaud, and your BrightArrow list updates automatically with the new information that night. With the Blackbaud Lists feature, you can choose to use the list one time or have it sync to BrightArrow on a nightly basis.
- Custom fields for mail merges: Custom fields in BrightArrow are normally dictated by your organization but with Blackbaud Lists you can choose the custom fields that are suited to your needs for each list you create. Custom fields have many purposes, but most importantly they can be used as mail merge fields when you create your BrightArrow message. Mail merge fields allow you to capture contact-specific information to dynamically insert into your message to personalize the message for each recipient. Custom fields are also helpful for adding filters or creating subset lists in BrightArrow.
- If you are a Blackbaud Education customer, when you create a Basic or Advanced list you will be able to choose which custom fields you would like to use when you are creating the list.
- If you are a Blackbaud Raiser's Edge NXT customer, you will be prompted with a variety of custom fields to include in your Blackbaud List.
- If at any time you need a custom field that is not already available for you to use, please contact us and we will add it for you if possible.
Blackbaud Lists for Schools
In Blackbaud EMS, you can create fully customized lists and sync them with BrightArrow. Follow the steps below.
Step 1: Create the list in Blackbaud
- In Blackbaud Core, navigate to Reporting > Manage Lists
- Click Manage basic and advanced lists
- Click Add to start creating your list, then choose either "Create Basic List" or "Create Advanced List" from the drop-down options. This article demonstrates the Blackbaud Lists feature with a Basic list, but the functionality will be the same if you choose to create an Advanced list instead.
- Select the "topic" that is best suited to the list you want to create.
- With your topic selected, click Next.
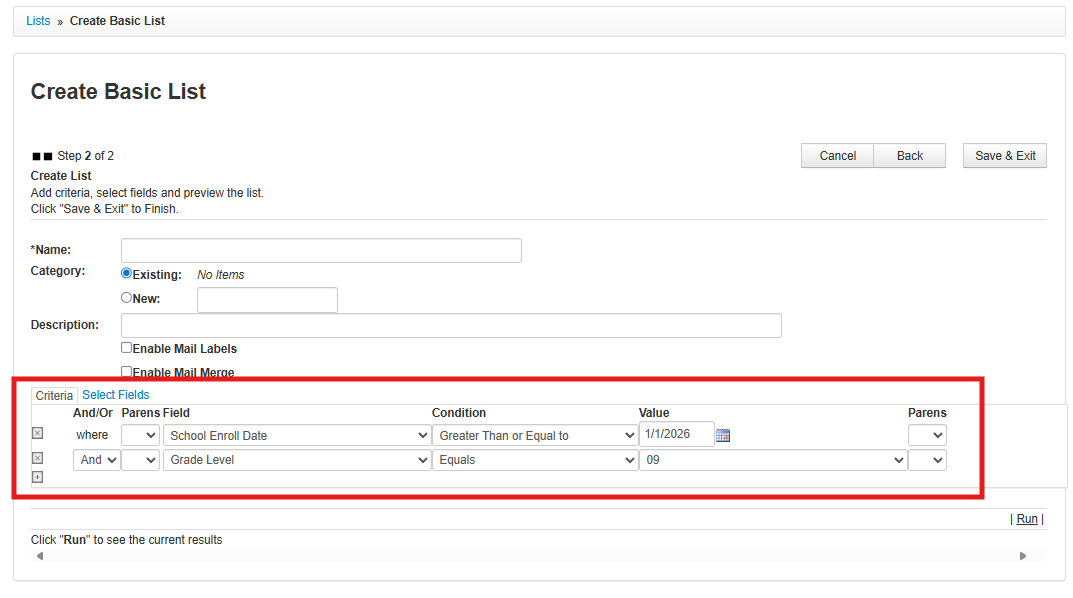
- Add "criteria" to filter the "topic" until your list has exactly the contacts you want it to.
- Use the + sign on the left to add additional criterion.
- Use the And/Or field to specify how the row should be applied.
- Use the "Parens" field to add parentheses to further segment your criteria.
- Use the Condition drop-down options to refine your results.
- Once you choose the "Field" from the drop-down options available, the "Value" field will update to show you the available options based on the Field you chose.
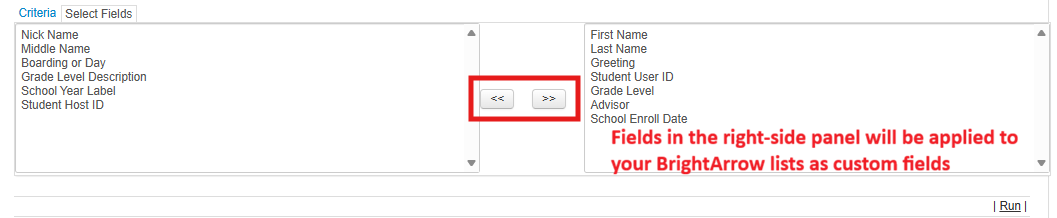
- Click Select Fields to start choosing the fields that will be included in your BrightArrow list as custom fields.
- Notice that First Name and Last Name are added automatically. You MUST also add Student User ID. For your BrightArrow lists to find each message recipients' contact information correctly, First Name, Last Name, and Student User ID are all required.
- Select any additional fields that you would like to have in your BrightArrow list. The fields you choose will be added as custom fields which can be used for internal processes, mail merge fields in messages, and for creating filtered or subset lists.
- Click Run in the bottom-right to see the results of the list you built. Make any changes and re-run as needed.
- Name your list. Give it a name that clearly describes it, especially if you intend to sync it with BrightArrow to use again in the future.
- If your list is exactly how you want it, click Save & Exit in the upper right


Step 2: Find the list in BrightArrow
With your list now fully created in Blackbaud, login to BrightArrow to finalize your list.
- Login to BrightArrow target or go to Communication > Mass Communication in Blackbaud
- Click the button Blackbaud Lists
- If your school uses Blackbaud EMS and Raiser's Edge NXT, make sure you have the "Education Management" tab selected to see your Basic or Advanced list
- The list you created most recently will automatically be selected in the Blackbaud List box. If you need to select a different list instead, use the drop-down arrow to bring up your lists then click on the list you want to select.
- Mark the check box to "Load phones/emails from an existing BrightArrow list" then select the existing BrightArrow list from the drop-down box that appears. Select an existing list that most closely aligns with the new list you created. For example, if the recipients of your new list are students, choose a list from the existing lists drop-down that also contains your students' contact information.
- Click Next


Step 3: Map your fields
Custom fields are stored in your lists under each contact and can be used for your reference/internal purposes, for filters to be applied when creating subset lists, and for use in mail merges to dynamically insert recipient-specific information into your messages.
In a regular BrightArrow list, there are custom fields associated with each of your contacts. However, those fields are the same for all of your BrightArrow lists and are usually pre-determined by your school's administrators. With Blackbaud Lists, you have the option to apply different custom fields to your lists.
The top portion of the "Map Fields" page contains "Primary Info" that is necessary for BrightArrow messages to send properly. Contact ID/Student ID, First Name, and Last Name must all be used for BrightArrow to link to your new Blackbaud list. Those three fields will look to the existing BrightArrow list you chose in Step #2: part 5 above and sync the information from that pre-existing list over to your new Blackbaud list.

- In the Custom Fields section, choose the fields you would like to have in your list (for mail merges) by selecting them from the drop-down options. Note that the custom fields in your Blackbaud List will be different than the fields in your pre-existing list. The fields available for mail merges in your Blackbaud List will be whatever fields you map in the Custom Fields section.
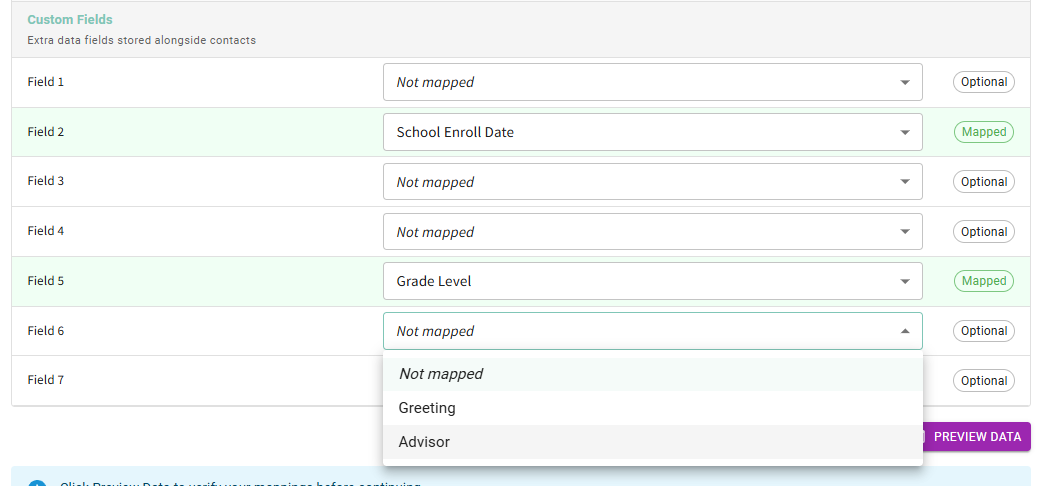
- Once your custom fields are selected, click Preview Data
- Review the data that is shown in the preview. Make any adjustments as needed, then click Next.


Step 4: Load and Sync
Synced lists are lists that update each night with the information in Blackbaud, so they capture any changes made to your contacts' information that are made throughout the day each day. With synced lists, you create the list one time and it stays up to date with any changes in your SIS.
With Blackbaud Lists, you have the option to load the list for one-time use or to create the list as a synced list that will be on your My Lists page and sync to Blackbaud each night.
- Mark the radio dial that suits your needs.
- If you intend on using the list again in the future, mark the top radio dial to "Load now and sync every night." Once your list is built, you will find it in your My Lists page to use again in the future.
- If you intend on only using the list one time, mark the bottom radio dial to "Load now, don't automatically resync."
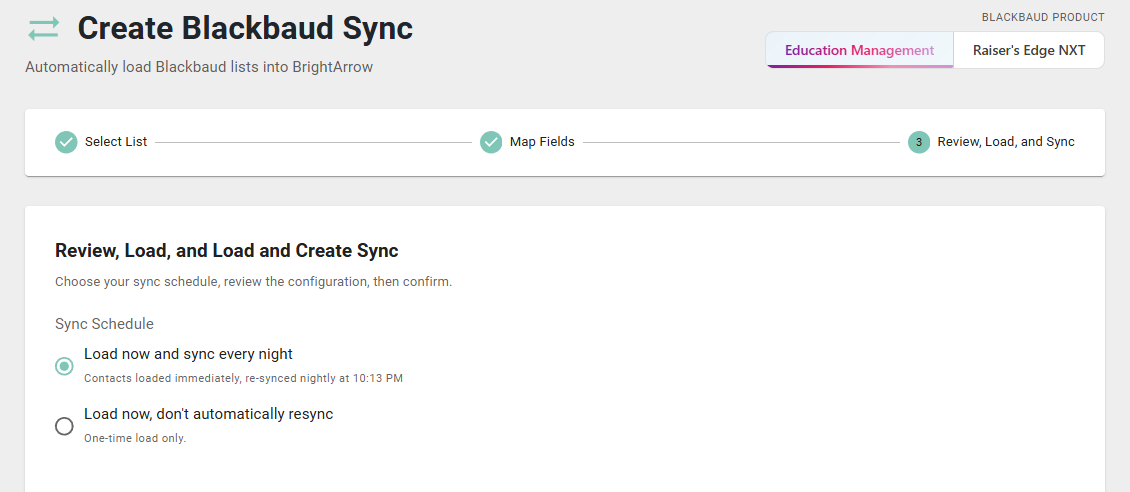
- Give your data/mappings a final review, then click the button to Load and Create.
- If you chose the top radio dial to sync your list so you have it for future use, you will see a pop-up window stating that your list is building. Click OK.


Step 5: Create your message
Your list is now ready to use and you will be redirected to the Create Message page. For help with creating a new message, see here.
FAQ's
Where can I find my lists when I need to use them again in the future?
If you've created a synced list using the steps above, you can find the list again in the future on your My Lists page in BrightArrow. Synced lists that were created originally in Blackbaud EMS will be in your My Lists page with the prefix "EMS:".

Can I share the list with other staff after it's been created?
Although synced lists with the word (sync) after the name cannot be shared directly, you can create a copy of the list to share with other staff members. See here for help with creating a copy of the list. See here for help sharing the copied list.
Can I add another contact directly to the list in BrightArrow?
For one-time use, you can add a contact directly to the list. This will work if you are adding them to the list and sending a message the same day. However, the list will be overwritten each night with the information that comes from Blackbaud, so your changes may not save. For existing list contacts, you will need to update their information in Blackbaud so that it comes over to BrightArrow correctly during the nightly sync. If you need to update the list to send a message right away, you can add or edit the contact in the BrightArrow list but also be sure to make those changes in Blackbaud as well.