Sending BrightArrow Messages through PowerTeacher
With the BrightArrow-PowerTeacher integration, teachers have a variety of options for sending messages to their students and students' families. This article will focus on the specific functions teachers can use to send BrightArrow messages through PowerTeacher.
Selecting students/families to message from the BrightArrow Search Page
From the BrightArrow Search page, you can send a message to parents, students, or both. Here you will be able to select entire courses or individual students/families to send messages to.
Note: Parents are associated with their respective student(s). You will run your filters on the students or their classes, then have the option to message the students, their parents, or both.

1. Use the various drop-down options to select the courses or individual students your message should sent to.
- Section - Choose the section(s) or student(s) to send your message to
- Grade Level - If you want to only message students in particular grade level, use this drop-down. This option can be used by itself to message all your students in a particular grade, or as an additional filter if you need to send a message only to the students/families
- Gender - Use this if your message should only go to students with a certain gender. Options include, Male, Female, Non-Binary, Other, and Unknown/Undeclared.
- Who - Choose to message only students, only parents, or both
- Type - You can choose to include only emails, only phones, or both
- Track - Use this to send messages only to students/families based on their educational track. Set the track first, then apply any other filters as needed.
2. With your filters now added, you can use the Show Results button to review which students/families will be included to receive your message.
 3. If your results look good, use the Create Message button to get started creating your BrightArrow message. If you need to make changes, you can click the Reset button to start over.

4. The BrightArrow Create Message page will load and you can start creating your message. See here for detailed instructions for creating new messages.

- Choose the type(s) of message you wish to send. You can send one message to all three of the main messaging types at once (Email, Texting, and Voice), or any combination of those.
- Notice that the number of contacts is based on the number of students. Example: You are messaging all the parents for 3 students. The number of contacts shown will be 3 because it pertains to the families of 3 students, not the number of parent contacts.
- We recommend giving your message a name in the Message Name (optional) field. This field will not show to the recipients, it is for internal use only. It will make it easier to find the message in your message summary reports or if you use the Load Prior Message option to find your message again in the future.
- Message Priority - the message priority should be "Informational" unless the message is a true emergency. See here for more information about sending emergency messages.
5. Click "Next" and proceed with creating your message until you get to the final screen. You'll have the following options:
- Send Message Now - this option will send the message now to the contacts that selected are on the list
- Save Message - this option will save your message so you can revisit it later to edit or send
- Schedule Message - this option allows you to schedule a time and day for the message to go out (for example, if it is currently 8am and you would like it to go out at 10am, you can set it here)
- Preview Message - this option allows you to send the message to yourself first so you can preview it
- Cancel - this will cancel your message creation and the message will not be saved
Messaging the class from the Current Classes page in PowerTeacher
The Current Classes page in PowerTeacher will show you all of your current classes, along with many options such as attendance, seating chart, lunch counts, student information, etc. On the Current Classes page you will see options for each class to Message Students and Message Parents. Use either of the messaging options to create a BrightArrow message to send to the entire class.

- Navigate in PowerTeacher to the Current Classes page (it might be your start page)
- Notice all of your courses are listed.
- Send a message to the parents OR students for the entire class by clicking the BrightArrow icon in the corresponding column for that course's row
- Send a message to all the parents OR students who are enrolled in your classes, click the BrightArrow icon in the corresponding column that shows next to "All current students (enrolled as of today)"

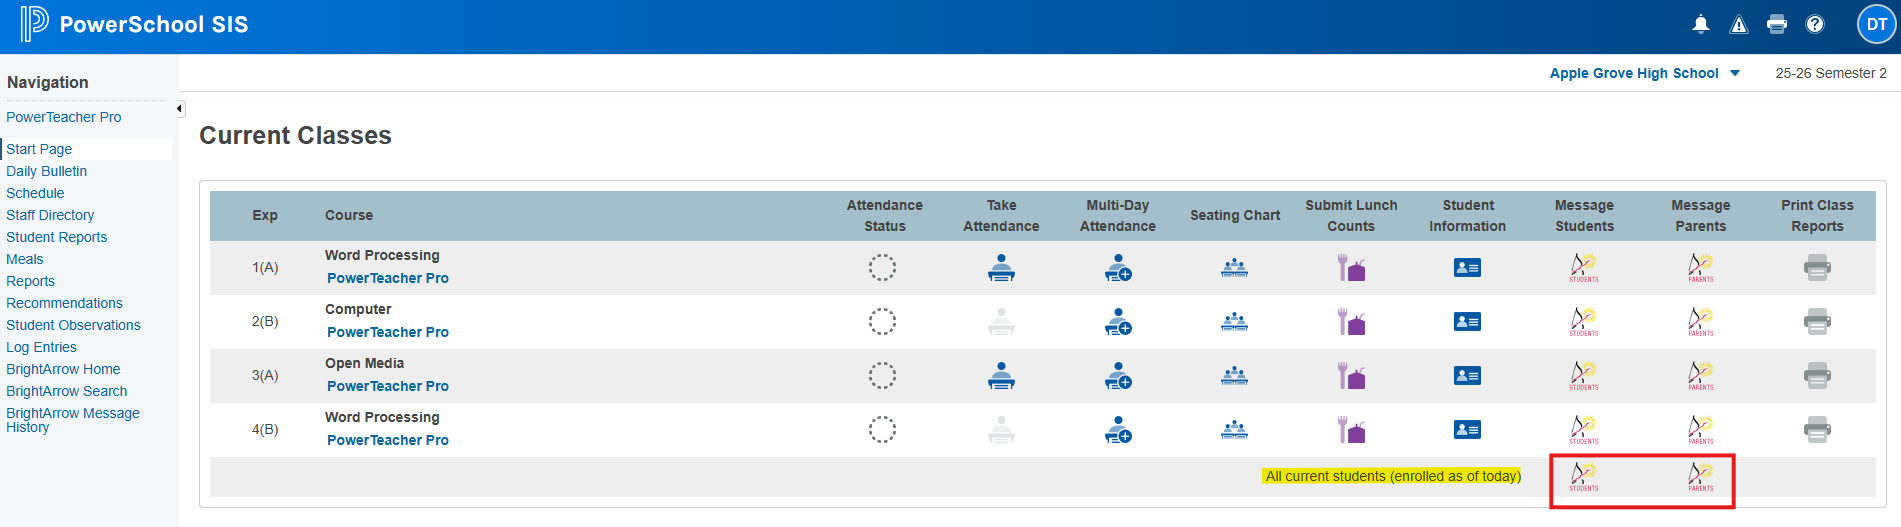
- Clicking the BrightArrow icon will open up BrightArrow's Create Message screen so you can start creating your message
- Select the message type(s) you wish to send. You can create and send emails, texts, and voice calls at the same time.
- Name your message. This field is optional but will be very helpful for finding it again in the future or for viewing the report summary to see who the message was delivered to
- Only change the message priority to Emergency if it is a true emergency. Generally speaking, your messages will be Informational
- If your school uses the BrightArrow ParentHub app, you can set a date here to make the message appear in the app as Urgent
- Note the number of contacts that the message will send to so that you can make sure your message will send to the correct number of students. **This number is based on the number of students. If you are sending the message to parents, the number of contacts shown will be the students, not the number of individual parents.
- Use the Next buttons throughout the message creator to proceed through to the next screen
- Use the hand icon to access help documents through BrightArrow's AI beacon
- With your message types selected and your message named, click Next to start creating your message
- Depending on the message types you selected, the system will bring you to the create message screen to start crafting your message. See here for additional help creating messages.
- Click "Next" and proceed with creating your message until you get to the final screen. You'll have the following options:


- Send Message Now - this option will send the message now to the contacts that selected are on the list
- Save Message - this option will save your message so you can revisit it later to edit or send
- Schedule Message - this option allows you to schedule a time and day for the message to go out (for example, if it is currently 8am and you would like it to go out at 10am, you can set it here)
- Preview Message - this option allows you to send the message to yourself first so you can preview it
- Cancel - this will cancel your message creation and the message will not be saved
Sending messages directly through the BrightArrow interface
With the BrightArrow-PowerSchool integration, teachers can find their contact lists to send messages to families. For ParentHub app users, these are the same contact lists that are linked to your ParentHub account.
- In PowerSchool, click BrightArrow Home in the Navigation panel to open the BrightArrow interface
- Click the My Lists button where you will see your roster/class lists
- Click directly on the name of any list to open the List Details page where you can see all student contacts with their respective parent's contact information
- Mark the check boxes next to each student's name who you want to send a message to. Students who do not have the checkbox checked will not be included in your message
- Use the checkbox located to the left of the bolded "Edit" header column to enable/disable all contacts in the list
- Important note: the selected students you enable/disable will stay that way until you change them
- If you are sending a message to multiple lists/classes at once, see here
- Click the Create Message button at the top of the page to start crafting your message. See here for more help with creating a new message.
