How to Review and Edit Contact Information in the Revere Message Center
In the Revere Message Center, you can easily manage the contacts (message recipients) within your list. This article is intended to help you review and manage your contacts within any list. For help managing contacts in the BrightView interface, see here and here.
Getting to the list's details
In the Revere Message Center, you can easily see all contacts (eligible recipients) within a list. From your Contact Lists tab, simply click on any list to see the details.
In the grid view, click directly on the "bubble" for the list you want to review:
 In the table view, click directly in the row for the list you want to review:
 Reviewing the list's details
 Reviewing the list's details
With the details of your list now showing, you can review your recipients as needed.

- List name (and list type): This is the name of your list along with the type of list. If you want to change the list's name, hover over it. An edit pencil icon will appear. Click the edit pencil, change the name of the list, then click the green arrow to save your changes. *Note that a (sync) list cannot be renamed because it is a list that directly imports data from your other source such as a SIS or HR Database.
- Back arrow: Click the arrow to exit the list's details and go back to the previous page.
- List type icon: The list name (#1) will show what type of list it is, but these icons depict that too. See here for more help understanding list types.
- Contact totals: This line shows the # of enabled contacts, # of disabled contacts, and total # of contacts (also see #14). Only the enabled contacts in your list will be sent your message.
- List Settings: This button will take you to the list's settings which can be used for a variety of purposes. For more information regarding list settings, see here.
- Import/Export Contacts: Use this button to import a spreadsheet of contacts into a list or to export the list of contacts to a spreadsheet. For more help importing/exporting contacts see here.
- Add List Message: If you have a list dedicated to a specific purpose, it can be very helpful to save a message to the list. Then, when you need to send the message you can easily pull it up to review and send or just send it without any review needed. Saving a message to a list is especially helpful for emergency situations but can be nice to have in any non-emergency situation where you are resending the same or similar message to a specific list again and again.
- Start BrightChat: If your organization has a subscription that includes Chats, you can use the Start BrightChat button to send a chat directly through the web interface.
- Search bar: Search for a specific contact by name, email address, or phone number.
- Hide disabled contacts: Any disabled contacts in a list will not be sent a message. Use the "hide disabled contacts" button to hide any disabled contacts from your view (also see #14).
- Enable All: Instantly enable all contacts within the list.
- Disable All: Instantly disable all contacts within the list. This can be especially useful if you just want to message a few contacts. Disable all, then only enable the few contacts you want to message.
- Add Contact: Add a new contact to the list. Note that for any lists that update automatically with a nightly sync, any contacts you add here will be deleted when the list is updated that night.
- Name: The name of the contact who the phones and emails pertain to. Note that schools may use a list like "All Parents" or "All Parents by Students" which list the student's name but the parent's contact information.
- Email: The email address(es) associated with the contact
- Phone: The phone number(s) associated with the contact
- Enabled: Only the contacts who are enabled in the list will be sent the message. Turn the Enabled toggle on to enable the contact so they can receive a message sent through the list. Turn the toggle off to disable them in the list so they won't be sent the message. The little dot next to their name also indicates if they are enabled. A green dot signifies they are enabled, a gray dot signifies they are disabled.
- Edit pencil: Click the edit pencil for any contact to view and manage details for them. You can edit their name, contact information, and custom fields that will be used in a mail merge. *Note that any edits made to a contact in a linked or synced list will be erased and overwritten when the source list updates.
- Delete trash can icon: Delete the contact from the list. *Note that any contacts you delete in a linked or synced list will be added back into the list when the source list updates.
Editing a contact
You can review, manage, and edit contacts within any BrightArrow list. Note that any edits made to a contact in a linked or synced list will be erased and overwritten when the source list updates. The type of list is shown in the list name and also indicated by the icon shown directly under the list name. For more help understanding list types, see here.
- As shown in the above section of this article, click the edit pencil icon (#18) to get to the Edit Contact window.
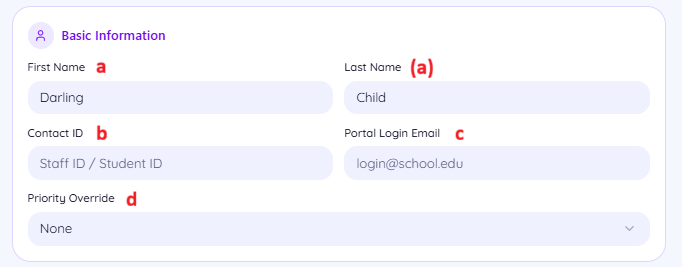
- At the top of the Edit Contact window, you will see the contact's "Basic Information." Review and make any edits as needed.
- First and Last name. This is the first name/last name field that would be included in a mail merge in your BrightArrow message. Note that for some lists, such as "All Students by Parents" this may not be the individual contact's name. In the case of an "All Students by Parents" list, this is the students name even though the emails and phones listed in lower sections are that of the parents.
- Contact ID: This may be pre-filled with data from your source (SIS, HR Database, etc.). If you created the list by importing a spreadsheet or manually entering the contacts, this field is available for you to use if you wish to associate a contact ID with each contact. This field is available to use in mail merges in your BrightArrow messages.
- Portal Login Email: This field is used only for customers who have the list set up for a community portal list, or for PowerSchool users who have enabled the PowerSchool Parent Portal for their families.
- Priority Override: The priority override can be used to force your voice call message to send to this contact before it sends to others but is typically only used in very specific scenarios. For help understanding and using this field, please contact our support.
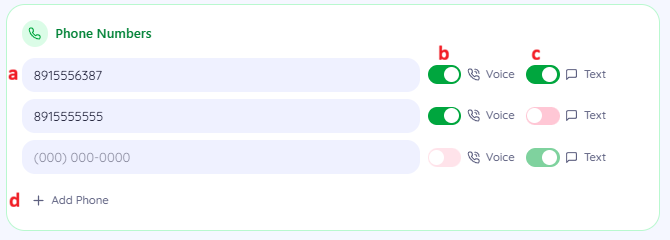
- In the "Phone Numbers" section, you can add, edit, and manage phone numbers for the contact.
- Phone numbers: Phone numbers may be shown as just all digits or they may be formatted as (###)###-####.
- Voice: If the voice toggle is turned off, a voice call to the phone number will not be attempted when you send it, even if the contact is enabled within the list.
- Text: If the text toggle is turned off, a text message to the phone number will not be attempted when you send it, even if the contact is enabled within the list.
- Add Phone: Use this to add an additional phone number for the contact. Note that any edits made to a contact in a linked or synced list will be erased and overwritten when the source list updates.
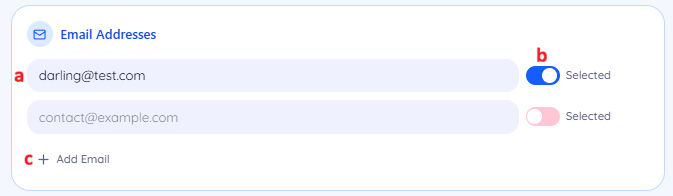
- In the "Email Addresses" section, you can add, edit, and manage email addresses for the contact.
- Email address: This is the email address that your message will be sent to for the contact
- Selected: If the toggle is turned off, an email message will not be sent to the address, even if the contact is enabled within the list.
- Add Email: Use this to add an additional email address for the contact. Note that any edits made to a contact in a linked or synced list will be erased and overwritten when the source list updates.
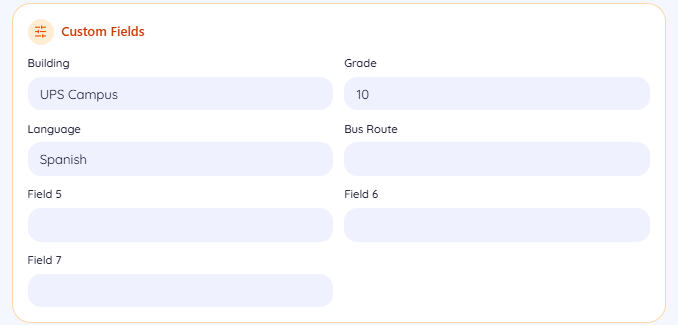
- In the "Custom Fields" section, you will see all the fields that apply to that contact. These fields can be used to create subset lists or used as mail merge fields to dynamically insert the information from the fields into your message.
- After making any changes, click the "save changes" button at the bottom of the window.


