Adding a Staff Directory to ParentHub
In the ParentHub app, you can have a staff directory show for your constituents so they will be able to see a list of staff members. With the directory set up, you can also enable the option for constituents to start chats with staff members. You can create the list of staff personnel to include only those who you'd like to be included in the directory, so if you want to exclude some staff members you can do that. In the Directory there are options for the configuration of the chats function as well, so you can opt for your constituents to be able to initiate chats with anyone in the directory or have the options be more limited.
If your organization has a Chat subscription with BrightArrow, the Directories feature can be enabled for you at no additional cost.
Getting started
The first step is to create your list in BrightView that will include all staff members you want to include in the directory. Once your list is created, BrightArrow support will need to enable the Directory feature for you.
- Create your list. You can use any method to create your Directory list, but the recommended approach is to make a linked copy of your main staff list (usually called "All Staff (sync)"). With this method, the new list will be linked to the main list so any changes to contact information in your main staff list will automatically filter down to the new copy. Another option is to create a list that will not link to your SIS or another BrightArrow staff list. See here for more help creating a basic list that you can manually import contacts to. With this option, any updates to the list must be made manually.
- Name the list. The name you give it is what will show in ParentHub for the directory, so we suggest naming it "Directory" or "Staff Directory" or "Find a Staff Member" or any name that will be easy for your contacts to recognize and understand.
- If you're making a linked list to be the source for your Directory, you'll leave the checkboxes on the List Actions page as is. "Keep linked to source list" should remain checked and "Derived list's enabled contact state matches the source list" should be unchecked. Then click OK.
- Make sure that the list only contains staff members to avoid other contacts appearing in the directory.
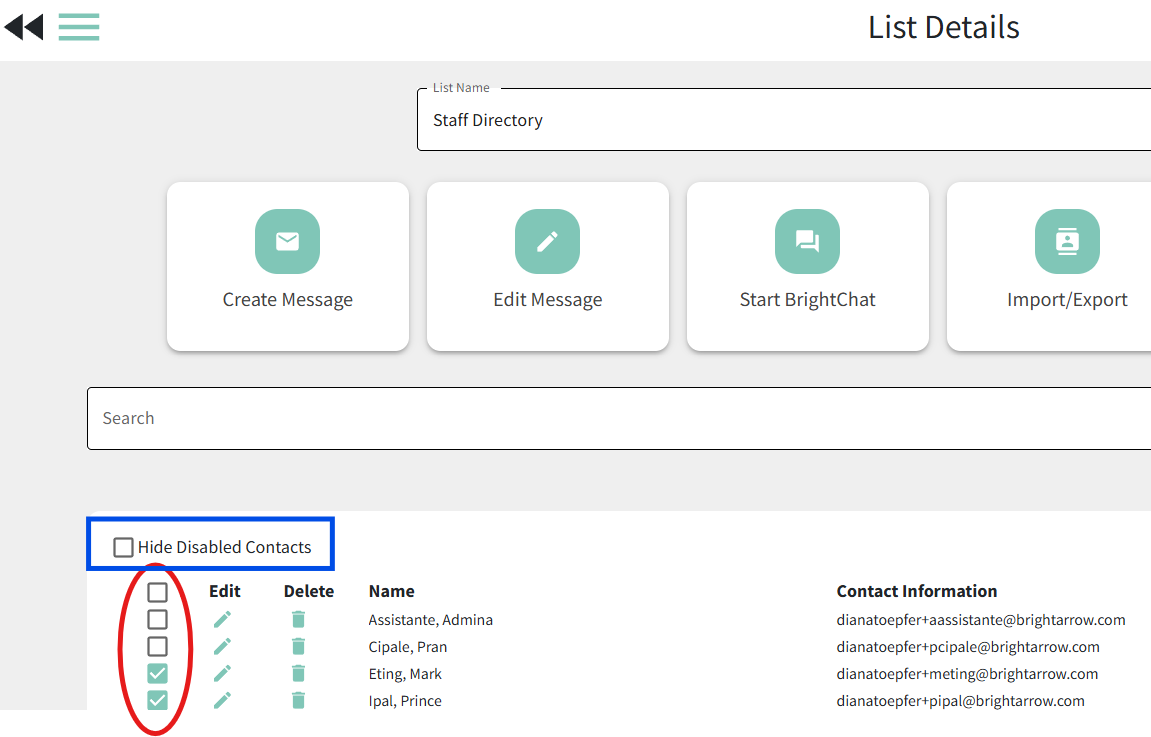
- Disable any contacts in the list that you do not want to appear in the directory by deselecting the checkbox next to that contact's name in the List Details page.
- Only the contacts who are enabled within the list will appear in the directory. Any contacts who are disabled/unchecked will not show in the directory.
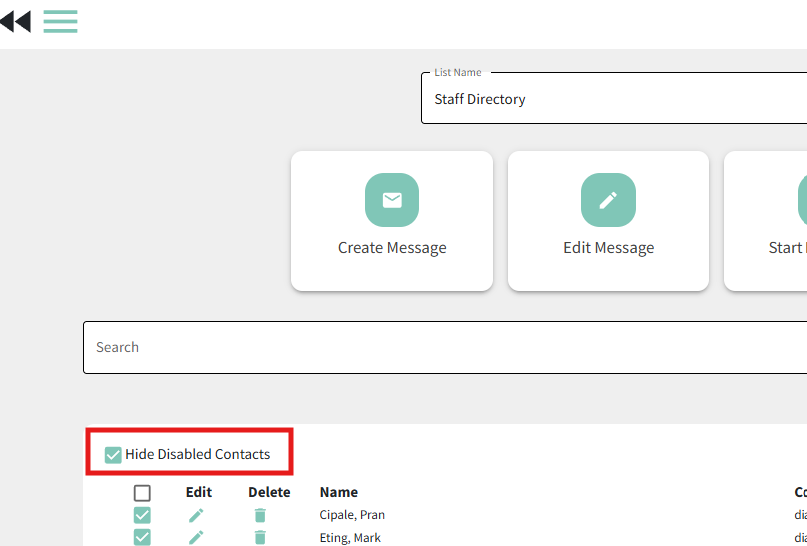
- Use the Hide Disabled Contacts checkbox if you don't want to see the disabled contacts when you go into the List Details page.
- Choose up to 2 fields that you want to show in the directory for each contact, for example Building, Department, Language, or any other field that you would like to have show in the directory.
- Contact BrightArrow support and let us know the exact name of the list and field number(s) you want to use for the directory so we can enable the feature.
- Note that even though both of the fields will be visible in the Directory, only one of them will be searchable. Let us know which field should be the searchable one if you have a preference, so we can make sure we code them in the correct order.
- With the list now set up, ensure it cannot be deleted by going into the List Settings and toggling ON "Disable deleting this list."
a. To make a linked copy of your staff list, navigate to the My Lists page, mark the check box next to the list you wish to make a copy of.
 b. With the list selected, go to Select An Action > Copy A List


Viewing the Directory in ParentHub
Once you've created your Directory list and BrightArrow has enabled it for you, you and your constituents will find it in the ParentHub app menu.
- Login to the BrightArrow ParentHub app.
- Tap the Menu tab. You will see the Directory located toward the top of the page.
- Notice that the name of your directory list is what shows.
- If you choose to change the name of your directory list in BrightArrow, you must inform our support so that we can make any necessary changes on our end as well.
- You will see all the staff members in your directory list, along with their email address, the fields you chose to include, and the option to chat with the individual (if you have it turned on in the list settings).


Comparing the BrightArrow list to the ParentHub Directory
With your directory list now set up, let's compare the BrightArrow list to the ParentHub directory.
- From the My Lists page in BrightView (BrightArrow web version), click on the name of your directory list to open up the List Details. From the ParentHub App Menu, tap on the Directory to open it.
- List Name - the name of the list in BrightArrow will be the title on your Directory.
- Enable or disable contacts - mark the checkbox accordingly to make that contact appear in the Directory. If the checkbox is not marked, the contact will not be in the Directory in ParentHub.
Ex: The contact "Eting, Mark" is not selected in the BrightArrow list, therefore he does not show up in the Directory in ParentHub.
- From the List Details page in BrightArrow, click the edit pencil next to any contact in your Directory list to open the Edit Contact page.
- The contact's name shows in the Directory as Last, First
- The contact's email address shows under their name in the Directory. If it doesn't show, see step "e" below.
- The field you chose as your first field shows next to each contact in the Directory, farther to the right. For this example, our first field is "building." ParentHub users will be able to use the filter funnel to filter the Directory based on this field.
- The second field you chose to have in your directory also shows next to the contact's name. For this example, our second field contains the staff member's position/title. This field is not able to be filtered by using the funnel in the app.
- Your contacts must have a Contact ID in BrightArrow for the app to associate that staff member with a ParentHub account. In the example below, you can see that the contact Admina Assistante does have a Contact ID and therefore her email address shows in the Directory. The contact Teacher, Ann (shown at the bottom of the Directory) does not have a Contact ID entered and therefore her email address does not show and instead shows as "No contact information provided."
- If your list in BrightArrow is linked to a list that gets information from your SIS or HR Database, your contacts will likely already have a Contact ID associated with them.
- If your list in BrightArrow was created manually, you may need to enter a Contact ID for each staff member. The Contact ID can be any number you want, but each contact must have a unique ID.


How to turn on the Chat feature for the Directory
Once BrightArrow support has confirmed that the Directory is enabled for you, your constituents will now be able to view the directory in the ParentHub menu. In the List Settings in BrightView, you can enable the chat option so that ParentHub users (parents, students, and other staff members) can initiate a chat message to anyone in the Directory listing.
Your organization has some options in regard to who the Chat feature will appear for. If you want all ParentHub users to be able to chat with any/all staff members in the directory, you can do that. If you want to turn on chat for only certain directory members, you can do that too. You can even set up your lists so that parents and students will have the option to chat with only their teachers. The Directory's chat enablement feature is based on the owner of the list, so depending on which lists you have the chat feature enabled for, the contacts within that list will be able to chat with the list's owner.
How to allow all ParentHub users to start a chat with all directory members
In most cases, your directory list will be set up at the district level. If you want all ParentHub users district-wide to be able to initiate a chat with any staff member across the entire district, this is the option for you.
- In BrightView > My Lists, navigate to the list that you use for the directory.
- Click List Settings.
- Under "Staff Directory Settings" turn ON the toggle to "Allow all ParentHub users to start a chat with these contacts."
- Note that the contacts in your directory list must have a BrightArrow user account in order for Chats to be sent to them.
- Click the double-back arrows in the upper left of the page to save your changes and return to the previous page.
- ParentHub users will now see the chat icon appear next to all members of the Directory.


How to allow ParentHub users to start a chat with only the directory members from their associated school or campus
Your directory might include all staff members across the entire district, allowing all ParentHub users to see the full list of staff members. If you want to make sure that chats can only be initiated by contacts within the same school building you can do that. Instead of turning on the Chat function in the Directory list itself, you will enable the chats in each specific list.
Ex: You want to allow staff, parents, and students at the Elementary School to be able to initiate chats with Directory members from that school, but they should not be able to initiate a chat with someone from the High School or Middle School.
If you want students/parents to be able to only initiate chats with their respective teachers/coaches, follow these same instructions. Instead of navigating to the school's list, you will instead turn on the toggle in the List Settings for each roster list.
- In BrightView > My Lists, navigate to a list that contains all contacts for just one school.
- This may be a superset list such as "All UPS Staff, Parents, and Students."
- If you do not already have a list like this set up for each school, contact us if you'd like help creating it.
- Click List Settings.
- Under "Staff Directory Settings" turn ON the toggle to "Allow List Contacts to start a chat with [list owner]."
- Note that the contacts in your directory list must have a BrightArrow user account in order for Chats to be sent to them.
- If there are multiple users selected in the "Users with access to" section, BrightArrow will default the Staff Directory Settings to the highest-level user/user group. For example, if the list is shared to an individual user (like a teacher), a mid-level user group (like a single school), and also the main group (like the district), the Staff Directory Settings will default to "Allow List Contacts to Start Chats with [the main group/district level]." In this case, in order to turn on the Directory's chat functionality for only the mid-level user group (UPS Campus per the example below), the higher-level group (ex: ABC Organization (admin)) must be deselected in the Users with access to section.
- Click the double-back arrows in the upper left of the screen to save your changes and return to the previous screen.
- Repeat steps #1-4 for each campus/school.
- Members in the specific list will now see the chat icon in the Directory for only the staff contacts that are in both the Directory list and also in the specific campus' list that they are included in. Users will still see all contacts in the Directory, but they will only be able to start a chat with the staff members who are in both lists.


How to allow ParentHub users to start a chat with only their associated teachers/staff members
If you want to make sure that parents and students can initiate chats with only their teachers/coaches and not any other staff members, you can do that as well. Refer to the instructions above for "How to allow ParentHub users to start a chat with only the directory members from their associated school or campus" but instead of turning on the toggle in the List Settings for the building, turn it on for every roster list. If you would like assistance with this, please contact our support and we'll be happy to set it up for you.
Troubleshooting the Directories feature
BrightArrow support is always available to assist for this feature, but some common scenarios are listed below if you'd like to try troubleshooting on your own.
I can see the staff members in the directory but there is no contact information provided
If you can see the staff members but there is no contact information showing for them, there are two possible reasons why this would occur. There must be a Contact ID and an email address for each contact in your BrightArrow list in order for their contact information to populate correctly to the Directory in the app.

- In BrightView (the BrightArrow web version), go into the Directories list and click on the edit pencil in the same row as contact's name who does not have their contact information showing.
- Check to see if the contact has a Contact ID and an email address associated with them. If either is missing, the app Directory will show "No Contact Information Provided."
- If your list syncs from your database or SIS, there will likely be a contact ID for each person, but if you created a static list there may not be one. Enter a Contact ID in the respective box at the top of the page. The contact ID must be unique for each contact but otherwise can be any random number.
- If your list syncs from your database or SIS and there is no email address present, you must add the email to your SIS or database. Otherwise, when the system runs the nightly sync, the information you enter will be overwritten. If you created a static list that needs to be manually updated, you can simply enter the email address. Ensure the checkbox next to the email address is checked before clicking "Apply" at the bottom of the page.
- Scroll to the bottom of the Edit Contact page and click "Apply" to save your changes.
- Refresh your ParentHub app.
- When you go back into the Directory in ParentHub, the contact information for that person will now show.


I see the staff members in the directory but there is no option to Chat with them
If your staff members appear to be loaded to the Directory properly but there is no Chat button next to their names, the Chat option can be turned on in the list's settings in BrightView (the web version of BrightArrow). There can be one or multiple lists with the Directory's chat feature enabled, depending on which staff members your contacts should be able to start chats with. See the section above regarding how to turn on the chat feature for the Directory for further assistance determining which lists to enable the chat function for.
I see the Chat icon next to some directory members but not all of them
There are three possible scenarios that could cause the chat icon to not appear next to a staff member's name.
- If your organization has set up the Directory to only allow chats based on the building's lists or teacher's lists, you will not see the chat icon for the staff members unless you are also a contact in the list that the Directory's chat function has been enabled for. See How to allow ParentHub users to start a chat with only the directory members from their associated school or campus for further explanation for this scenario.
- If the Chat icon is showing for some staff members but not all, it may be that they don't have a user account set up in BrightArrow to be able to receive Chat messages. The BrightArrow SuperAdmin can check the User Accounts listing in BrightView to ensure the staff member has a user account. See here for help adding a new user account in BrightArrow.
- If a staff member has a user account but has never received a BrightArrow chat, email, text or voice message, the Chat icon may not show next to their name because the BrightArrow web version has not yet linked them to their ParentHub account. Sending any message type to the user will remedy this.
Some staff members are not showing in the directory in ParentHub
If you have staff members who are not appearing in the Directory, check your Directory list in BrightView to make sure they are in the list and enabled.
- In BrightView > My Lists, click directly on the name of the list that is used for your Directory. That will open the List Details so you can see all members in the list.
- If the staff member appears in the list, make sure the checkbox next to their name is checked, otherwise they will not be in the Directory in ParentHub
- If you don't see the staff member in the list, check to see if disabled contacts are being hidden. If the "Hide disabled contacts" box is checked, uncheck it to show all disabled contacts.
- If your staff member is not in the BrightArrow list at all, contact our support and let us know the name of the list and the staff member who is missing so we can help to determine what is causing them to not appear in the list.

How to make sure some staff members do not turn off the Chat option for themselves
If you've opted to turn on the Directory's chat feature for your roster lists, technically the owners of those lists (teachers) will have the option to turn off the chat toggle in the list's settings. This way, each list owner (teacher) will be able to decide if they want to allow students to initiate chats with them. If you want to avoid this so that the list owners do not have the option to turn off the Directory chat for their rostered contacts, you can adjust their user permissions to disallow changes to the list settings. This is done on a by-user basis and must be completed by the BrightArrow superadmin for your organization.
- Logged in as the SuperAdmin, navigate to User Accounts.
- Find the user who should not have the ability to make changes in their list's settings. Click the edit pencil near their name.
- Scroll to the bottom of the "User Edit" page. Under "User Permissions" check the box to "Prevent this user from changing list settings."
- Click OK at the bottom of the page to save your changes.
- Repeat these steps for each user or user group that you would like to stop from being able to make changes to the list settings.

